If you are looking for a way to change the App Store Country on iPhone without Credit Card, it is likely that you are on holidays in another Country and do not have a Credit Card issued in that particular Country.
In such cases, Apple provides the option to change App Store Country on iPhone and Mac by selecting the “None” payment option, which becomes available when the following conditions are met.
- You are physically located in a New Country
- You do not have any unpaid Balances or Credits
- You are not subscribed to any Apple Service
- You are not using Family Sharing
Note: Apple checks the physical location of your device by using Location Services.
Change App Store Country Without Credit Card
Based on above information, Apple device users who are actually located in a New Country should be able to change the App Store Country by selecting the “None” payment option.
If you are unable to meet any of the above conditions, the only way to change App Store Country without providing a Credit card or Payment method is by creating a New Apple ID.
1. Change App Store Country Without Payment Information
If you are physically located in a New Country, you should be able to change the App Store Country on your iPhone, without providing credit card or any other type of payment method by using the following steps.
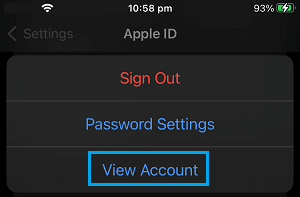
1. Open Settings > tap on your Apple ID Name.
2. From the Apple ID screen, go to Media & Purchases > On the pop-up, select the View Account option.
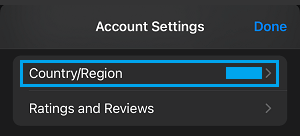
3. On the next screen, select Country/Region.
4. Enter your Apple ID Password > select your New Country > tap on Continue > Agree to Terms & Conditions.
4. On the next screen, select None as Payment Method, select State/Province of the New Country in which you are currently located and tap on Done.
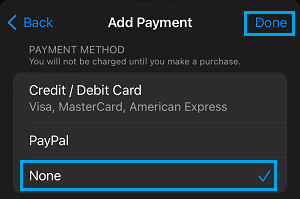
Note: Based on our experience, there was no need to provide Billing, Shipping and other information on this screen, which should be the case for most users in a foreign Country.
2. Change App Store Country By Creating New Apple ID
The “None” payment option won’t be available, if you are using the paid version of iCloud storage or subscribed to any Apple service.
In such cases, the only way to change App Store Country or Region is by creating a New Apple ID, which involves the following three steps.
- Sign Out Of Current Apple ID
- Create New Apple ID
- Sign-in to New Apple ID and select New App Store Country.
1. Sign Out of Current Apple ID
Follow the steps below to sign-out of your current Apple ID on iPhone.
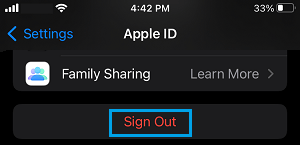
1. Open Settings > tap on your Apple ID.
2. On the Apple ID screen, scroll down and tap on the Sign Out option.
3. On the confirmation pop-up, select the Sign Out option to confirm.
After signing out of Apple ID, the next step is to create a New Apple ID
2. Create New Apple ID
In order to create a New Apple ID, you need to have another Email Address which is not associated with any Apple service (Current or past Apple ID’s).
If such an Email Address is available, you can create a New Apple ID by using steps as provided in this guide: How to Create Apple ID Without Credit Card.
3. Select New App Store Country
After creating New Apple ID, you can follow the steps below to Sign-in to your device and select the New App Store Country.
1. Go to Settings > tap on Sign in to your iPhone link.

2. On the pop-up, enter your New Apple ID and Password in order to sign-in to your device.
3. From the Apple ID screen, go to Media & Purchases > On the pop-up, select View Account option.
4. From the next screen, go to Country/Region > select your New Country > tap on Continue > Agree to Terms & Conditions.
5. On the next screen, select None as Payment Method, select your State/Province, provide your phone number and tap on Done.
6. Hopefully, you should now be on the Congratulations page, tap on Done to save the changes.