iPhone Recovery Mode can be defined as a built-in safe troubleshooting state, during which it can allow a computer to reinstall iOS, update firmware, restore from backup and perform a Factory Reset process.
While this definition is based on the idea of manually forcing an iPhone into Recovery mode, iPhone can also enter Recovery Mode by itself; if it detects corrupted system files or any other serious issues with the operating system.
In this case, Recovery Mode can be defined as a built-in safety mechanism; which has been designed to prevent an iPhone from suffering further damage and facilitate troubleshooting in a “fail-safe” state.
Put iPhone in Recovery Mode
You may find the need to manually put iPhone into Recovery Mode, if it has become totally unresponsive, is stuck on Apple Logo, stuck in a Boot-loop or become disabled after failed passcode attempts.
In such cases, Recovery Mode provides a last-resort opportunity to bring iPhone back to its working status by updating firmware, reinstalling iOS, restoring from backup or performing a Factory Reset.
Steps to Enter Recovery Mode on All Models of iPhone
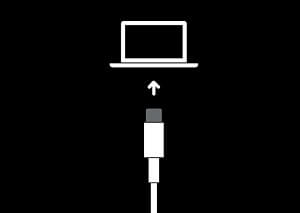
You can force iPhone into Recovery Mode by connecting it to MacBook or Windows computer with the latest version of iTunes installed on it.
1. Connect iPhone to computer using its charging cable.
2. Open the Finder on your Mac. If you are using Windows computer, open iTunes (If it is already open, close iTunes and open it again).
3. Next, follow the steps to manually put iPhone into Recovery Mode; based on the model of your device.
iPhone 8 and later: Press and release Volume UP button > Press and release Volume Down button > After this, press and hold the Side button (Power Button), until you see the black recovery mode screen.
iPhone 7/7 Plus: Press and hold the Side and Volume Down buttons at the same time. Keep holding them, until you see the Recovery Mode screen.
iPhone 6 or earlier: Press and hold both Home and Side (Power) buttons at the same time. Keep holding them, until you see the Recovery Mode Screen (iTunes Logo and Cable).
Note: Do not release the button as you see iPhone starting with Apple Logo. Continue holding the button, until you see Recovery Mode Screen.
4. Update or Restore iPhone Using iTunes
When iPhone enters Recovery mode, you will see a pop-up on the screen of the computer, providing the options to either Update or Restore the device.
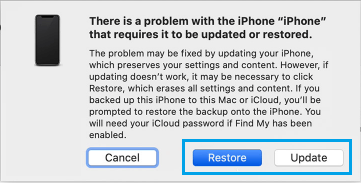
If you select Update, iTunes will try to install the latest version of iOS software on your device, without erasing any of its data.
If you select Restore, iTunes will completely erase the data from your device and install the latest required software on your device.
In both cases, wait for iTunes to download the software on your iPhone. If the download is taking longer than 15 minutes and iPhone exits recovery mode, you will have to go back to step 3 and repeat the process.
5. Setup iPhone Using Backup or as New Device
After the Update/Restore process is completed, you will find your iPhone starting with the ‘Hello’ screen.

Follow the instructions, until you reach ‘Apps & Data’ Screen. Select Restore from iCloud or iTunes option (if a backup is available). If not, select Set up as New iPhone option.

Note: If a backup is not available, your only option is to Set Up as New iPhone and you won’t be able to recover the data on your iPhone.
How to Exit Recovery Mode?
If you change your mind, you can quickly get your device out of Recovery Mode by following the steps below.
iPhone 8 & Later: Quickly Press and release Volume Up and Volume Down buttons > Press and Hold the Side button, until you see your device starting with white Apple Logo
![]()
iPhone 7/7Plus: Hold both Volume Down and the Side buttons (ON/OFF button), till you see your device starting with Apple Logo
iPhone 6 and earlier: Press and hold Home and Power (Side button), until you see your device starting with Apple Logo.