iPhone comes pre-installed with its own native Weather App, which can be used to get timely Weather Alerts and Notifications about the prevailing and expected weather conditions in the City or Town in which you are currently located.
While you can manually check the Weather App to get an idea about the prevailing weather conditions in your area, setting up the Weather App to provide Notifications can be more useful.
In-fact, if you live British Columbia (Canada) and certain parts of United Kingdom, the iPhone Weather App might help you start your day on a brighter note by providing you with a less gloomy weather notification!
Get Weather Alerts on iPhone
Since, Apple’s native Weather App already comes pre-installed on iPhone, all that is required to start getting Weather Alerts on iPhone is to allow the Weather App to send you notifications.
However, the first step is to provide the Weather App with access to your Location Information, so that it can send you timely Weather Alerts that are specific to the actual place or area that you live in.
Step 1: Allow Weather App to Access Your Location
As mentioned above, the first step to get Weather Alerts on iPhone is to permit or allow the Weather App to access your Location Information.
1. Go to Settings > Apps > Weather > Location.
2. On the next screen, select the Always option, in order get timely Notifications from the Weather App.
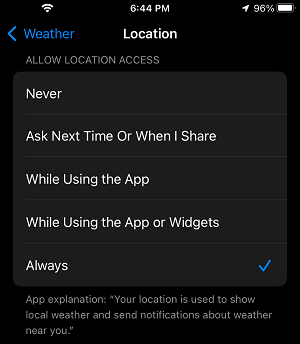
On the same screen, you can scroll down a bit and enable Precise Location to improve the accuracy of Weather App Notifications and Alerts on your iPhone.
Note: If you select While Using the App or While Using the App or Widgets, you will only be able to check weather related information in your area by going to Weather App or the Weather Widget.
Step 2. Enable Notifications in Weather App
If you haven’t used the Weather App as yet, it won’t be available for selection via the Notification Settings on your iPhone.
Hence, the best way to enable Weather Notifications on iPhone is by going directly to the Settings of the native Weather App.
1. Open the Weather App on your iPhone.
2. First tap on 3-bar Icon (bottom-right) > Next tap on 3-dots Icon (top-right) and select Notifications in the drop-down menu.
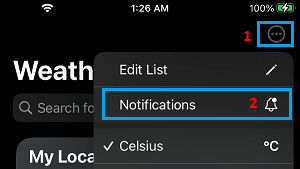
3. On the next screen, tap on Continue > On the pop-up, select the Allow option.
4. On the next pop-up, you can allow the Weather App to send you Critical Notifications, which are designed to appear with a distinct, alarm like sound (Similar to Amber Alert Sound).
Here it needs to mentioned that critical Weather Alerts are not frequent and they appear only when severe, dangerous and life-threatening weather conditions are forecasted in the area.
Note: Critical Weather Notifications are designed to bypass Do Not Disturb and they can appear, even when your device is Muted or kept in Silent Mode.
Step 3. Configure Weather Notifications on iPhone
In this step, you can take a look at the default Notification settings made by the Weather App on your iPhone and modify or change them to suit your own requirements.
1. Go to Settings > Apps > Weather > Notifications.
2. On the next screen, make sure Allow Notifications is enabled (Green). You can enable Critical Alerts, if you live in an area with extreme or severe Weather conditions.
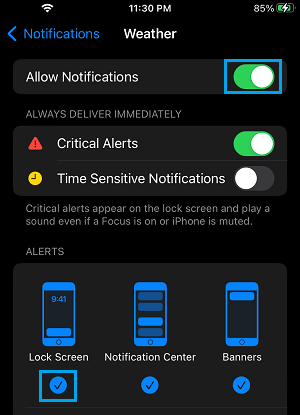
In the Alerts section, you can check Lock Screen to get weather alerts on the Lock Screen of your iPhone or select Notification Center to get weather alerts only in the Notification Center.