When Windows Search is not working, it is known to become totally unresponsive and it may even prevent you from clicking or typing inside the Search Box.
While the problem of Search function not working on a Windows computer is usually reported after installing updates, it can also happen at any other time.
In addition to buggy or improperly installed updates, Windows Search can also stop working due to indexing issues and the Search service being disabled or not working properly.
Windows Search Not Working
If Windows Search bar located next to the Start button is preventing you from typing or not searching, you won’t be able to quickly access files, folders and apps on your computer.
Hence, let us go ahead and take a look at the steps to fix the problem of Windows Search not working on a Windows 11/10 computer.
1. Restart the Computer
Sometimes, the problem is due to a stuck program or process preventing Windows Search from functioning properly.
This can be fixed in most cases, by shutting down the computer and Restarting it back again after 60 seconds.
2. Restart Windows Search Service
It is not uncommon for Windows services to be switched off or become stuck. In most cases, this can be fixed by restarting the impacted Windows Service.
1. Press Wondows + R keys > Type services.msc and press the Enter key.

2. On the Services screen, right-click on Windows Search and click on Restart option.
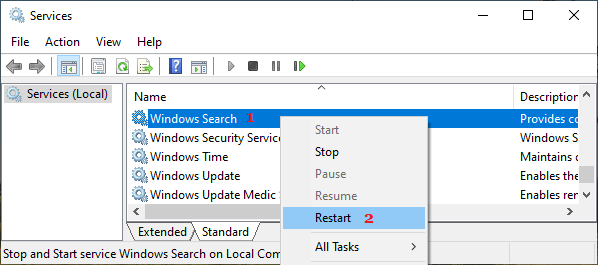
Note: If you find Windows Search Service not running, click on the Start option.
3. Use Windows Search & Indexing Troubleshooter
You can make use of the built-in Windows Search & Indexing troubleshooter to find and fix the problem with Windows Search on your computer.
1. Go to Settings > System (left-pane) > scroll down in the right-pane and click on Other Troubleshooters.

2. On the next screen, scroll down and click on the Run button, located next to Search & Indexing Troubleshooter.
3. On Search and Indexing screen, select the Applicable options and click on the Next button.
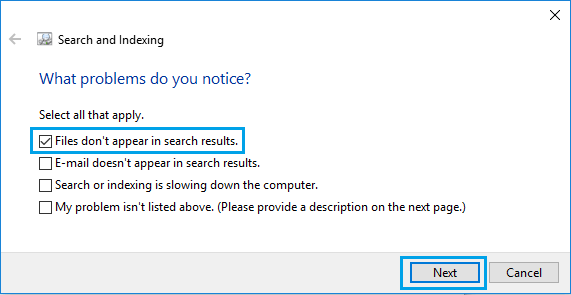
Follow the on-screen instructions as Windows tries to fix Search and Indexing related problems on your computer.
4. Restart Windows Explorer
Restarting Windows Explorer service can help in fixing bugs/glitches in the File Explorer process, which can have an adverse impact on the search functionality of your computer.
1. Right click on the Taskbar and click on Task Manager.
2. On the Task Manager screen, right-click on Windows Explorer and select the Restart option.
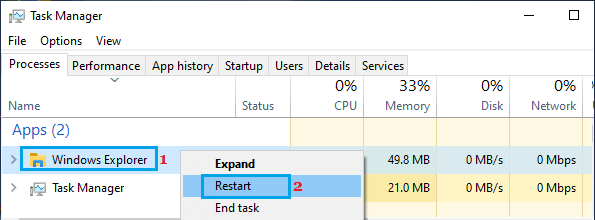
This will refresh and restart Windows Explorer on your computer. After this, try to use the Search bar on your computer and see if it is now working.
5. Use Enhanced Search
In order to speed up the Search feature, the default option in Windows is to limit the search to Documents, Pictures and Music Folders.
If you want Windows to search for files in other locations, you will have to enable Enhanced search.
1. Go to Settings > Privacy & Security > scroll down to “Windows Permissions” section in the right-pane and click on the Search tab.

2. On the next screen, select the Enhanced Search option.
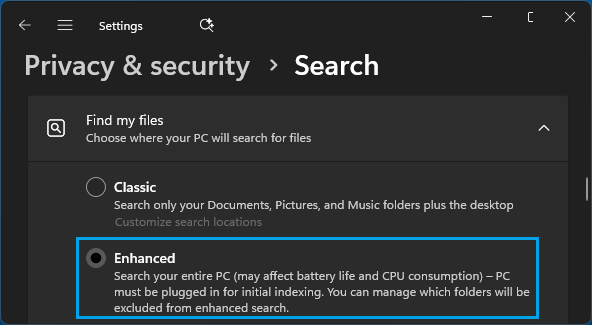
Note: This makes Windows to search the entire computer, which can delay search and have an adverse impact on Battery life.
As mentioned in the screenshot, you can prevent the delay by excluding Folders from Windows Search.
6. Rebuild Windows Search Index
In rare cases, the problem is due to the Search Index being broken or corrupted. In such cases, you need to go through the time consuming task of Rebuilding the Search Index.
Note: Deleting and Re-building the Search Index can impact the search experience on your computer, until the Search Index becomes fully operational.
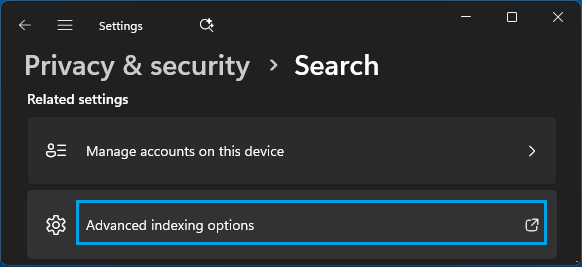
1. Go to Settings > Privacy & Security > click on the Search tab, located under “Windows Permissions” section.
2. On the next screen, scroll down to “Related Settings” section and click on Advanced Indexing options.
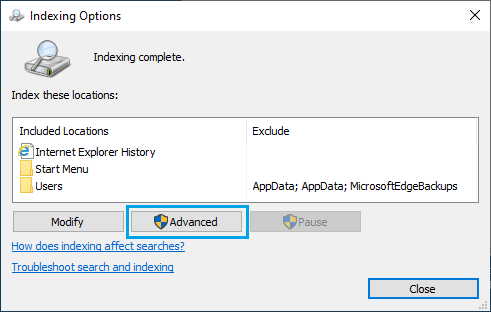
3. On the next screen, click on the Advanced button.
4. On Advanced Options screen, click on the Rebuild button.
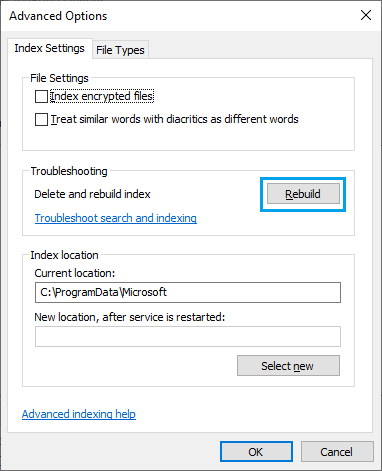
5. On the confirmation pop-up, click on OK to confirm and wait for Windows to rebuild the Search Index on your computer.
Note: Do not shut down the computer or interrupt the process in any way.