Adding Multiple Clocks to the Taskbar of your computer can be helpful, if your work or business requires you to conduct online meetings with people living in other countries and time zones.
For example, someone working for the Head Office of a company located in Pacific Time Zone might be required to interact with people working for its branches located in Mountain Standard Time (MT), Central Standard Time (CST) or Eastern Time Zone (ET) time zones.
Similarly, it is fairly common for employees in the tech sector to be interacting with people located in different time zones and different Countries, located all over the world.
Add Multiple Clocks to Taskbar in Windows 11/10
When a New Windows computer is setup, the operating system adds a clock to the taskbar showing the Date and Time for the Country or the Time Zone that was selected during the setup process.
In addition to this default clock on the Taskbar, you can add two more clocks to the taskbar, which can be setup to show the time in two different Countries or two different Time Zones.
1. Add Multiple Clocks to Taskbar Using Control Panel
You can add a second or third clock to the Taskbar using the following steps.
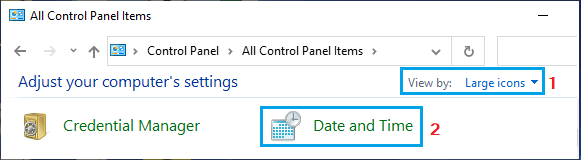
1. Open the Control Panel on your computer.
2. On the Control Panel screen, switch to Large Icons view and click on Date & Time.
3. On the next screen, switch to Additional Clocks tab, select Show this clock box, select the Time Zone or Country for which you want to add the first Clock and Enter the Display Name for the Clock.
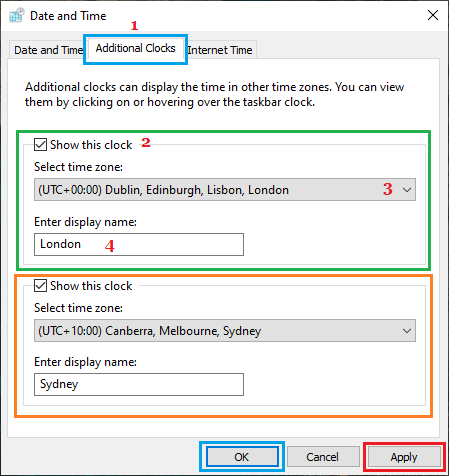
To add the second Clock, select Show this clock box, select the Time Zone or Country for the second clock and type the Display Name for this clock.
4. Once you are done, click on Apply and OK to save these two Clocks on your computer.
2. Add Multiple Clocks to Taskbar Using Settings
If your computer is not suffering from an update bug, you should be able to Add Multiple Clocks to the Taskbar by using the Settings menu.
1. Open Settings > select Time & Language in the left-pane and click on Date & Time tab in the right-pane.
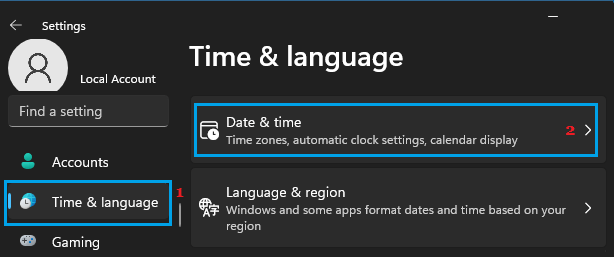
2. On the Date & Time screen, scroll down to Related Settings section and click on Add Clocks for different time zones link.
3. On the next screen, go to Additional Clocks tab and Add Clocks by selecting Show this clock box, the Time Zone or Country for which you want to add the Clocks and typing the Display Names for the Clocks.
4. Make sure you click on Apply and OK to save this change on your computer.
3. How to View Multiple Clocks on Windows Computer
Even if you add multiple clocks to the Taskbar, it will only display one clock on the Taskbar, showing time for the current location in which the computer is located.
However, you can view the other two clocks that you added to the Taskbar by clicking on the Local Clock located in the taskbar of your computer.
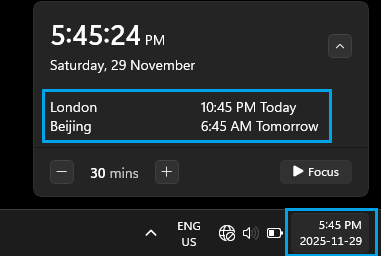
Once you click on the Clock in the taskbar, you will be able to see the other two clocks, showing the current time in two additional Countries or Time Zones.