If you are unable to Authorize your computer in iTunes due to “Cannot Authorize Computer on iTunes” error message, you can find below the steps to fix this problem.
Cannot Authorize Computer On iTunes
In you are unable to authorize your computer with iTunes, it could be due to any of the following reasons.
- Problem with your Apple ID or minor iTunes Glitch
- You have too many computers linked to your iTunes Account
- You have Corrupted iTunes Info Files on your Computer
Luckily, all these issues can be fixed using troubleshooting steps as provided below.
1. Problem with Apple ID or Minor iTunes Glitch
It is quite possible that iTunes is having a problem recognizing your Apple ID or there is some glitch in iTunes that is preventing it from recognizing your computer.
In most cases, this can be easily fixed by logging out of iTunes Account and logging back in again.
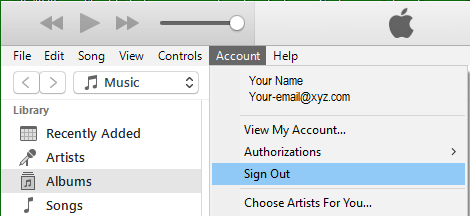
1. Open iTunes on your computer > click on the Account tab in top-menu bar and select the Sign out option.
2. After you are signed out of iTunes, open iTunes > click on the Account tab and select the Sign-in option.
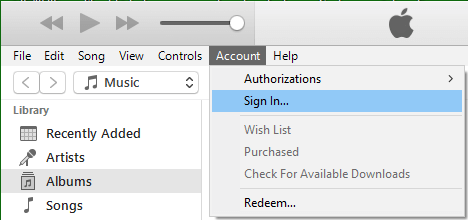
After you are signed-in, try to authorize your computer again.
2. Too Many Computers Linked to iTunes
iTunes allows you to authorize up to 5 computers per Account, you won’t be able to authorize any more computers once you reach this limit.
However, it is possible to exceed the 5 computers limit, even if you are not using 5 computers. This usually happens when old computers that you are no longer using are still attached to your iTunes Account.
Your Computer count on iTunes can also go up when you do a fresh installation of Windows without De-authorizing the Computer on iTunes first. In such cases, iTunes counts your single computer as 2 computers.
Irrespective of the case, the problem can be fixed by using the option to “De-authorize All computers” as available in iTunes.
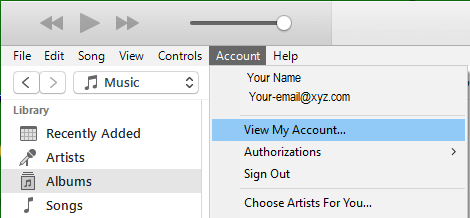
1. Open iTunes on your Computer > click on the Account Tab in top-menu bar and select View My Account… option in the drop-down menu.
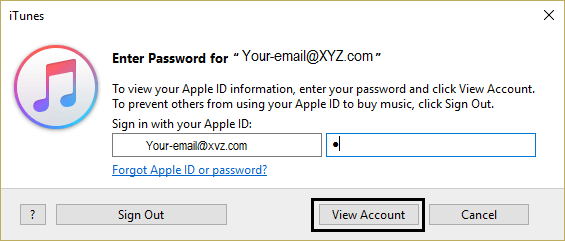
2. On the next screen, enter your Password and click on View Account button.
3. On Account Information screen, you will be able to see computers that are linked to your iTunes Account under section Apple ID Summary.
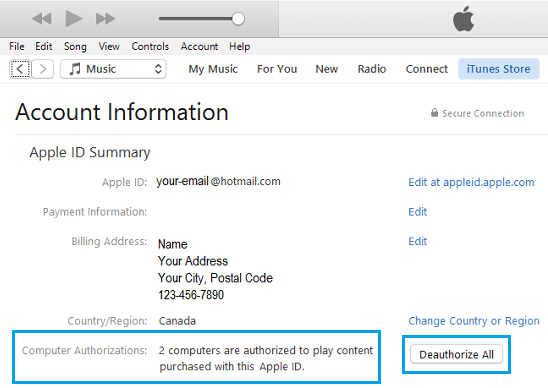
You can click on De-authorize All button to remove Computers linked to your iTunes Account.
4. On the confirmation pop, click on De-authorize All Computers to confirm.
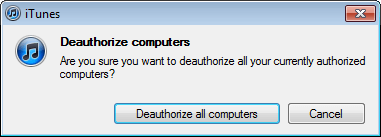
This will De-authorize all computers in your iTunes Account, allowing you to start from a clean slate.
If you need need help in authorizing computer to iTunes, you can refer to this guide: How to Authorize Windows or Mac Computer to iTunes.
Note: You can use the option to De-authorize All Computers only once in 12 months.
3. Remove SC Info Folder
If you are still having problems authorizing your computer in iTunes, the problem might be due to corruption of iTunes Info Files located on your computer.
This problem can be fixed by removing and re-installing iTunes on the computer. If the problem still persists, you need to remove iTunes SC Folder from the computer and allow iTunes to build a new SC Info Folder.
1. Logout from iTunes and open the File Explorer on your computer.
2. On the File Explorer screen, click on View tab and check the little box next to Hidden items.

3. After enabling hidden files, navigate to Local Disc (C:) > Users > All Users > Apple Computer > iTunes > SC Info. Next, right-click on the SC Info folder and select the Delete option.
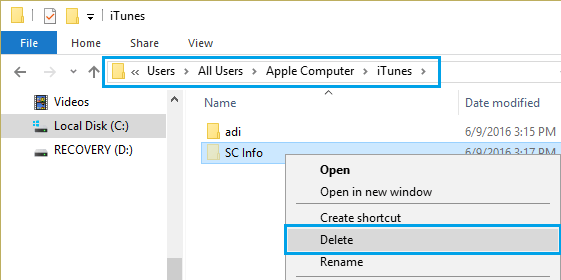
4. Restart the computer > Open iTunes and try to Authorize your computer in iTunes.
Hopefully, you should have no problem authorizing your computer to iTunes this time.