While the problem of a computer clock being slow or incorrect is more common on older computers, it can also occur on new Windows 11/10 computers.
In the case of older computers, the problem is usually due to the CMOS battery that supplies power to clock running out of power.
In the case of new computers, the reason for the clock being slow or incorrect could be due to the computer losing contact with Windows Time Service, Incorrect time & date settings, malware and also hardware related issues.
With this understanding, let us go ahead and take a look at the steps to fix the problem of incorrect or slow clock on a Windows 11 or Windows 10 computer.
Why is Windows Computer Clock Running Slow?
If the clock on your Windows 11/10 computer is running slow or not showing the right time, you should be able to fix the problem using the following steps.
1. Manually Synchronize the Clock on Your Computer
The first step would be to manually synchronize the clock on your computer.
Windows 11: Go to Settings > select Time & Language in the left-pane. In the right-pane scroll down to “Additional Settings” section and click on Sync now button.
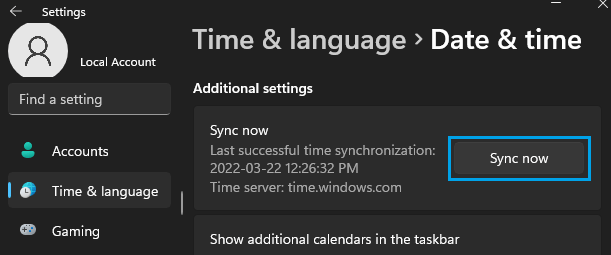
It should take only a few seconds to to Synchronize the time on your computer with Windows Time Service.
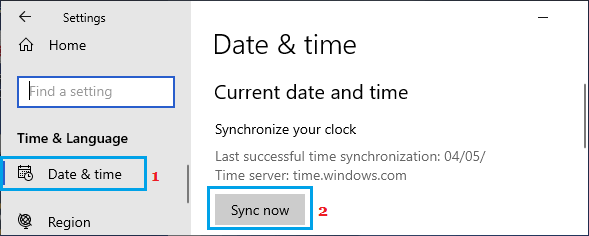
Windows 10: Go to Settings > select Time & Language > On the next screen, select Date & Time in the left-pane and click on the Sync Now button in the right-pane.
2. Change Time Zone
A common reason for computer showing incorrect time is due to the Time Zone on the computer not matching with the Time Zone in which the computer is located.
Windows 11: Go to Settings > Time & Language > Select Time & Language tab in the left-pane. In the right-pane, select the right Time Zone as applicable in your case.
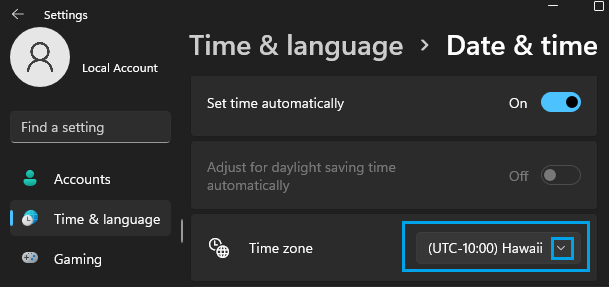
On the same screen, scroll down to “Additional Settings” section and click on Sync Now button.
Windows 10: Go to Settings > Time & Language > select Date & Time in the left-pane. In the right pane, use the down-arrow to select the right Time Zone as applicable in your case.
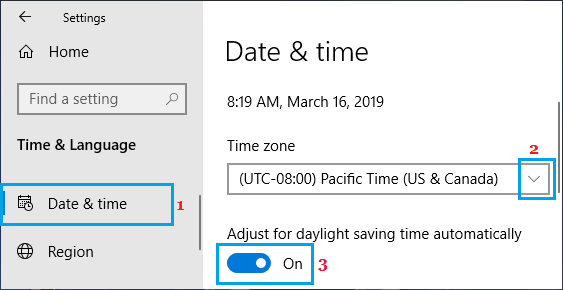
After this, scroll down and click on the Sync now button to set the most accurate Date & Time on your computer.
3. Switch to Another Time Server
The default option in Windows 11/10 is to automatically obtain time from Windows Time Server. Since the computer is still showing incorrect time, switch to another Time Server and see if this helps in fixing the problem.
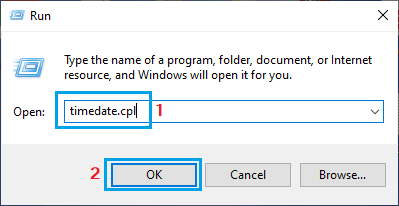
1. Right-click on the Start button and click on Run.
2. In the Run Command Window, type timedate.cpl and click on OK.
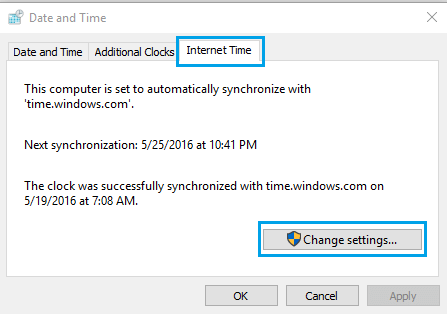
3. On Date and Time screen, switch to Internet Time tab and click on Change Settings button.
4. On the next screen, check the little box next to Synchronize with an Internet time server, select time.nist.gov or any other Time service and click on Update Now button.
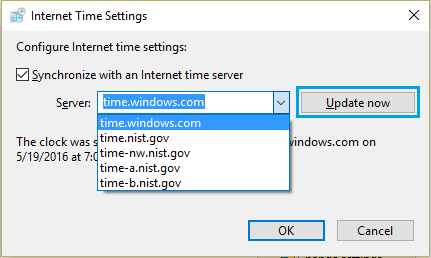
Note: You can stick to the default Microsoft Time Server (time.windows.com) or choose another server.
5. Once the Synchronization process is completed, you will see “The clock was successfully synchronized” message.
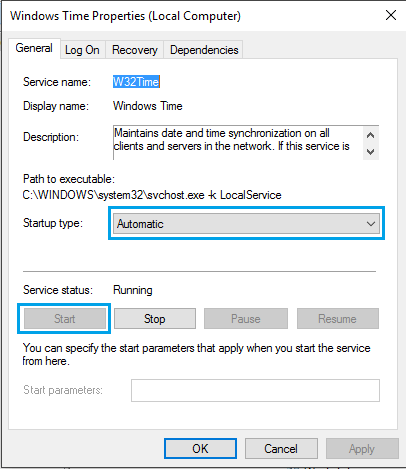
5. Make Windows Time Service Automatic
Set Windows Time Service to automatically start on the computer and see if this helps in fixing the problem.
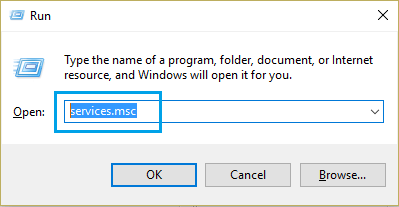
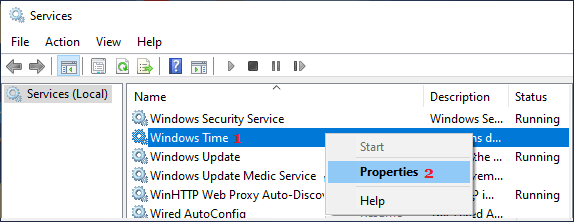
1. Press Windows + R keys to open the Run command.
2. In the Run Command window, type Services.msc and click on OK.
3. On the Services screen, right-click on Windows Time and click on Properties.
4. On the next screen, change the Startup type to Automatic and click on the Start button.
After this, start monitoring the time on your computer for a few days.
If the computer clock starts losing time again, the problem might be due to presence of malware or the CMOS battery on your computer be near the end of its life.
5. Scan the Computer for Malware
The problem of slow or incorrect clock on your computer could be due to presence of Malware or Viruses on the computer.
Hence, make sure that the Antivirus program installed on your computer is up to date with the latest virus definitions. This can be done by clicking on Live Update option as available on most third-party antivirus software programs.
In addition to this, you can scan your computer for malware using Microsoft’s free Malware Removal Tool.
6. Replace CMOS Battery
CMOS which stands for ‘Complementary Metal-Oxide Semiconductor’ is a static Random Access Memory device that stores the BIOS values on the computer, including date and time information.
The CMOS chip is powered by a Lithium Ion battery so as to keep the BIOS data active even when the computer is switched.
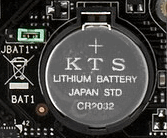
Image source: biosflash.com
When the CMOS battery goes bad or comes to end of its design life, CMOS chip starts losing information and this is indicated by the slowing down of the clock on your computer.
The simple solution in this case is to replace the CMOS battery with a new one. CMOS batteries are inexpensive and very easy to replace in the case of desktop computers.
However, replacing a CMOS battery on a Laptop computer is not easy, especially on newer computers that are not designed to be repair friendly.