Your first chance or opportunity to create Apple ID appears right during the setup process of a New iPhone, iPad or Mac. If you do not have an Apple ID as yet, it is likely that you skipped Apple ID creation during the setup process.
While you can use iPhone and other Apple products without creating an Apple ID, creating an Apple ID provides access to App Store, iTunes, iCloud and allows you to use Apple’s free iMessage service.
Create Apple ID on iPhone, Mac and PC
An Apple ID is basically an Email Address registered with Apple. Hence, all that is required to create an Apple ID on iPhone or Mac is to provide your Email Address to Apple.
After providing Email Address, you will be asked to setup an eight-digit password for your Apple ID. Make sure that your Apple ID Password is not the same as your Email Account Password.
1. Create Apple ID on iPhone
You can create an Apple ID right on your iPhone by following the steps below.
1. Go to Settings > tap on Sign in to your iPhone link.

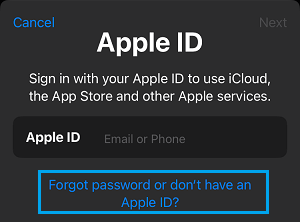
2. On the next screen, tap on Forgot password or don’t have an Apple ID? link.
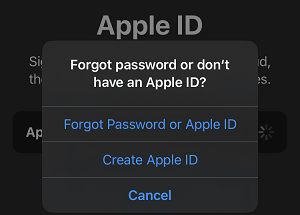
3. On the pop-up, select Create Apple ID option.
4. On the next screen, enter your First Name, Last Name, Date of birth and tap on Continue.
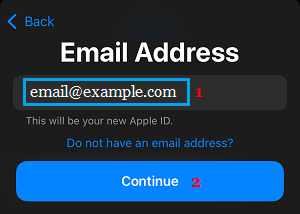
5. On the next screen, type your Email Address and tap on Continue.
6. Follow the next set of onscreen instructions to create password, select Country and complete the process of creating your New Apple ID.
Once the process is completed, you will receive a confirmation Email from Apple.
7. Login to your Email Account and confirm your Apple ID Email Address.
2. Create Apple ID on Mac
You can also create Apple ID by opening System Preferences on your MacBook, Mac Mini or iMac.
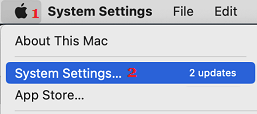
1. Click on Apple Logo in top-menu bar and select System Settings or System Preferences.
2. On System Settings screen, click on the Sign in Option.

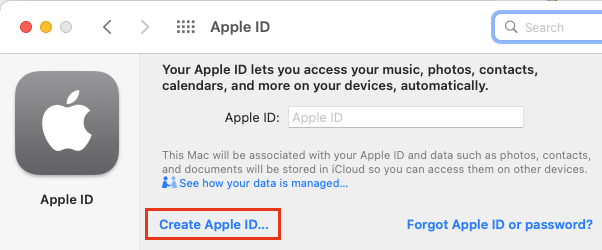
3. On the next screen, click on Create Apple ID Link.
4. On the next screen, enter Date of Birth and click on the Next button.
5. On the next screen, enter your Name, Password, Verify Password and click on Next.
6. You will now get a confirmation Email from Apple. Login to your Email Account and verify the email.
Once you verify the Email, your Apple ID will become active.
3. Create Apple ID on Windows PC
Apple ID can also be created on Windows PC or Mac by going to Apple ID Account Page.
1. Open the web browser on your computer and go to appleid.apple.com and click on the Sign-in option.
2. On the next screen, click on Create your Apple ID Link located at the top-right corner of the screen.

3. On the next screen, enter your Name, Country, Birthday, Email Address, Password, Confirm Password and click on Continue.
4. On the same screen, select and answer two Security questions and click on Continue.
The Email Address that you provide in this step will become your Apple ID and the password will become your Apple ID Password.
4. Create Apple ID on App Store
You can also create Apple ID by launching the App Store App on your iPhone or iPad.
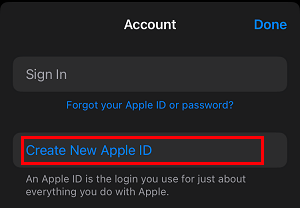
1. Open the App Store on your iPhone and tap on the Account icon.
![]()
2. On the Account screen, tap on Create New Apple ID link.
3. On the next screen, enter your Email Address, Password, Verify Password, select Country, Agree to Terms and conditions and tap on Next.
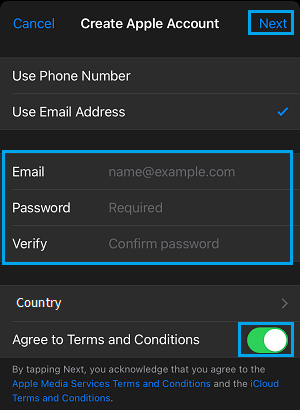
Note: Password needs to be 8 characters with at-least one lower cast and one upper case letter.
4. On the next screen, enter your First Name, Second Name, Birthday and follow the onscreen prompts to complete the next steps.
Once you have completed all the required steps, you will be asked to verify your Apple ID by logging into your Email Account.