While Books in digital format do not take up much storage space, you may want to delete them from your iPhone or iPad, in order to prevent your device from getting cluttered with Books.
This can be done by using the native Books App on your iPhone, which provides the option to remove Books and also the option to recover deleted Books, at any time on your iPhone or iPad.
Delete Books on iPhone or iPad
You can follow the steps below to delete books from iPhone or iPad using the Books App.
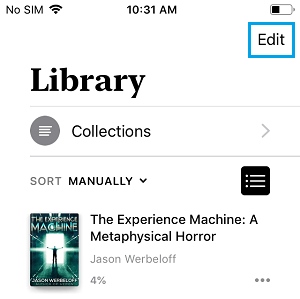
1. Open the Books App on your iPhone and tap on the Library tab located in bottom menu.
2. On the next screen, tap on the Edit option located at top-right corner of the screen.
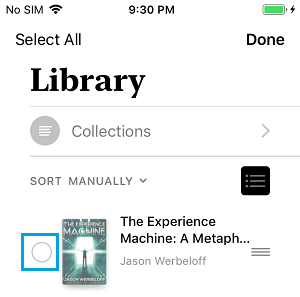
3. On the Editing screen, you can select books that you want to delete by tapping on the little circle next to the books.
4. Once the Books are selected, tap on the Trash icon located in the bottom menu.
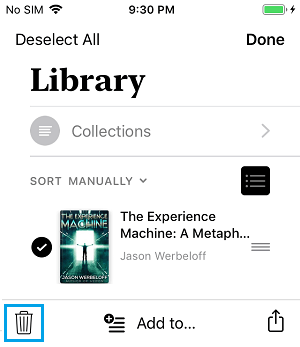
5. On the confirmation pop-up, select Remove Downloads option to remove the selected books from your iPhone.
You can also delete Books on iPhone by tapping on the 3-dots icon located next to the Book that you want to delete and selecting the Remove option in the menu that appears.![]()
Prevent Deleted Books From Showing Up On iPhone
Even after the Books have been deleted from iPhone, they will still remain visible in your Library with a cloud icon.
While, this setup is designed to make it easy for you to download the deleted Books, it defeats the whole purpose of deleting books, in case the idea was to reduce the clutter of Books in your Library.
Luckily, it is really easy to prevent deleted Books from showing up in the Book Library on your iPhone.
1. Open Books App and tap on the Library tab.
2. On the next screen, tap on the little Menu icon next to the deleted book that you want to hide.
![]()
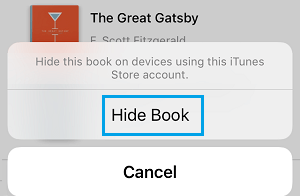
3. On the menu that appears, select the Remove… option.
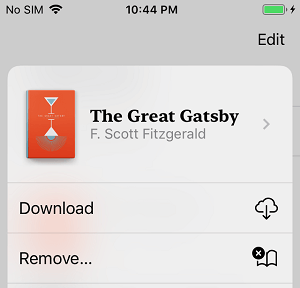
4. On the next pop-up, tap on the Hide Book option.
This way you can prevent Deleted Books appearing in the Book Library on your iPhone.
How to Recover Deleted Books on iPhone and iPad
Since, all Apple purchases including the deleted Books are linked to your Apple ID, they can be easily found and downloaded at any time on your iPhone, without the need to pay for them again.
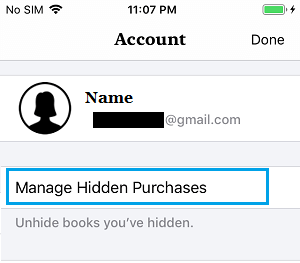
1. Open Books App > switch to Reading Now screen and tap on your Profile icon.
![]()
2. On the Accounts screen, select Manage Hidden Purchases option.
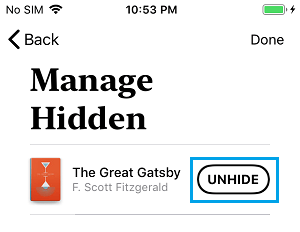
3. On the next screen, tap on the Unhide option, located next to the deleted Book that you want to download back on your device.
4. After unhiding the book, go to Library tab and tap on 3-dots Menu Icon located next to the deleted Book.
![]()
5. Next, tap on the Download option in the menu that appears.
The selected Books will be downloaded back on your iPhone.