Understanding the difference between a Public & Private network is important; as it can greatly impact your online security & privacy.
For example, going by the terms “Public & Private”; you may assume a Private Network as being protected and hidden from others and Public Network as being open and unprotected. However, it is exactly the opposite.
Your computer remains hidden from other devices when it is using a Public Network and it remains visible and discoverable when it is using a Private Network. Hence, it is recommended to connect to unsecured networks (Airports, Library, Hotel) using Public Network.
Note: Even if you are at home, selecting the connection type as “Public” in Windows Settings provides an extra layer of security.
Public and Private Network in Windows
In the case of a Windows computer, the choice between a public and private network determines whether your computer is visible to other devices on the same network and whether it can share files and printers.
Network Discovery: When you select Public network; Windows automatically disables network discovery, which results in your computer being hidden from other devices on the same network.
Changing the network type to “Private” enables network discovery, which makes your computer visible to printers, computers and other devices on the same network.
File & Printer Sharing: As you must have already guessed; File & Printer sharing is disabled by default on Public Network and gets automatically enabled on a “Private network”.
Windows Firewall: Windows applies its most restrictive rules and blocks most inbound traffic; when any network is designated as being a “Public Network”. When you change the network type to “Private”, the Firewall becomes flexible and starts facilitating inbound traffic from other devices on the same network.
Applications: Using Public Network is recommended for connecting to Wi-Fi networks at Airports, Hotels, Coffee shops, Libraries and other untrusted networks. Private Network is suited for connecting to trusted networks (Home Wi-Fi).
1. Switch from Public to Private Network In Windows
While the default setting in Windows is to use a Public Network, you can easily switch from Public to Private network by going to “Network & Internet” settings on your computer.
1. Go to Settings > Network & Internet > Click on Properties tab for the active network on your computer.
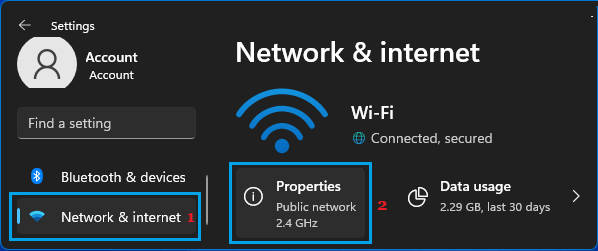
2. On the next screen, you can switch from Public to Private or Private to Public, depending on your requirements.
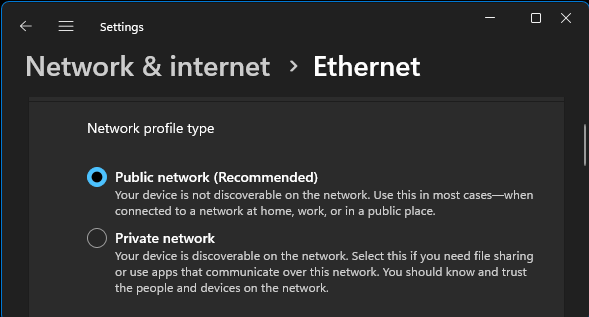
Once you select the required option, Windows will setup the Network as Private to Public, depending on your selection.
2. Switch from Public to Private Network in Windows 10
If you are using Windows 10, you can switch any network on your computer from public to private by using the following steps.
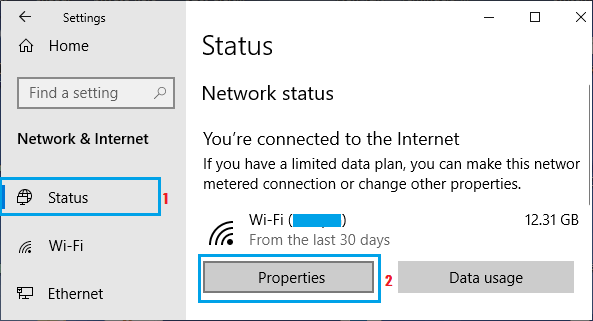
1. Go to Settings > Network & Internet and click on Properties button for the active network on your computer.
2. On the next screen, you can set the Network Type to either Public or Private under “Network Profile” section.
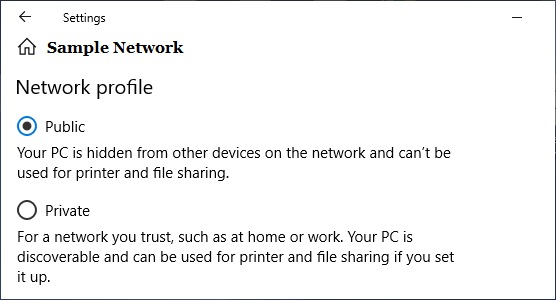
Once the Network type is selected, Windows will setup the Network on your computer.