While the Fast Startup feature is enabled by default on a Windows computer, you may find the need to disable Fast Startup, if it is causing problems on your device.
In certain cases, the Fast Startup feature is known to prevent the computer from shutting down properly, which can result in open files not being saved and updates not being installed during the shutdown process.
In case of computers using Dual Boot, users have reported instances of files being damaged, becoming corrupted and have also reported instances of Hard Disk corruption due to Fast Startup.
Also, the Fast Startup feature can prevent access to BIOS/UEFI settings during Startup, which is another reason for users searching for a way to disable Fast Startup.
Why Disable Fast Startup?
While most users continue using Fast Startup without even being aware of it, some users want to disable Fast Startup for the following reasons.
1. Fast Startup prevents the computer from shutting down properly, which results in open files not being saved and updates not being applied during shutdown (they are applied when you restart).
2. Depending on the computer, Fast Startup may prevent you from accessing BIOS/UEFI settings during Shut Down.
3. While Fast Startup provides significant boost to startup times on computers using HDD drives, it has lesser impact on computers using SSD Drives.
4. Fast Startup is known to interfere with encrypted disk images. The solution for this problem is to manually dismount encrypted drivers before shutdown.
5. When you shut down a Fast Startup enabled computer, it locks down the Hard Drive and prevents it from being accessed using another operating system (Dual Boot).
6. Fast Startup uses the Hibernate File, which takes up storage space.
If you are using Dual Boot, it is recommended that you disable Fast Startup, as users have reported instances of File and Hard Disk corruption.
1. Disable Fast Startup Using Run Command
The easiest way to disable Fast Startup is by going to Power Options settings on your computer.
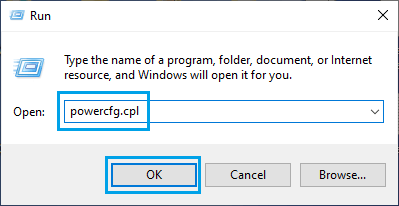
1. Right-click on the Start button and click on Run.
2. In Run Command window, type powercfg.cpl and click on OK.
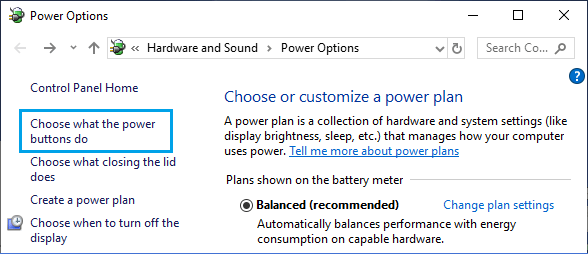
3. On Power Options Screen, click on Choose What the Power Buttons Do link.
4. On the next screen, scroll down to “Shutdown Settings” and uncheck Turn on fast startup option.
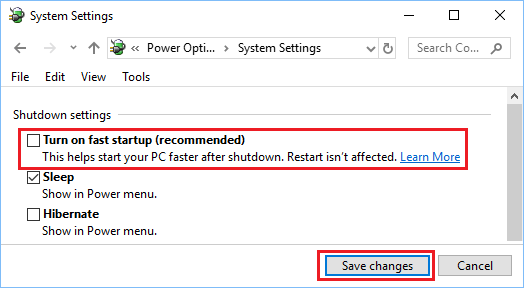
5. Click on Save Changes button.
This will disable Fast Startup on your computer, until the next major Windows 10 update.
Note: If you do not see the Fast Startup option, it means that Hibernate Mode is not enabled on the computer. You can quickly enable Hibernate Mode by opening Command Prompt and executing powercfg/hibernate on command.
2. Disable Fast Startup Using Control Panel
If link to “Additional Power Settings” is not available on your computer, you can disable Fast Startup by using Control Panel.
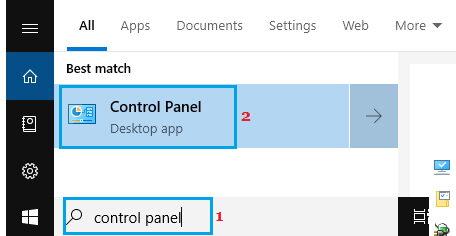
1. Type Control Panel in the Search bar and click on Control Panel Desktop App in the Search results.
2. On Control Panel screen, switch to Large or Small Icons view and click Power Options.
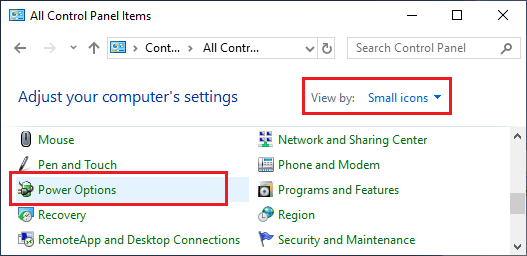
3. On Power Options screen, click on Choose What the Power Buttons Do.
4. On the next screen, scroll down to “Shutdown Settings” and uncheck Turn on fast startup option.
5 Click on Save Changes to save and implement this change on your computer.
3. Permanently Disable Fast Startup Using Registry
This method should prevent Windows 10 from enabling Fast Startup via an update. It is recommended that you backup registry files before going ahead with these steps.
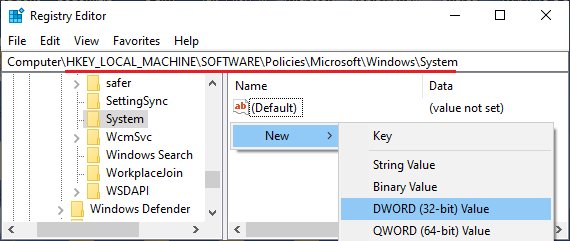
1. Right-click on the Start button and click on Run. In Run Command window, type regedit and click on OK.

2. On the Registry screen, navigate to HKEY_LOCAL_MACHINE/SOFTWARE/Policies/Microsoft/Windows/System
3. Right-click in the right-pane and select New DWORD option.
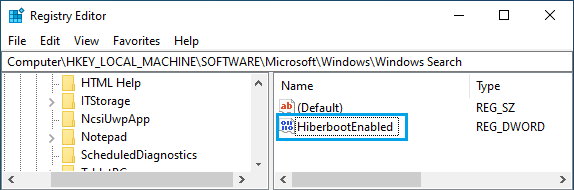
4. Name the New DWORD as HiberbootEnabled and make sure its value is 0 (which will be 0 by default).
Exit Registry and restart the computer to implement this change.
Impact of Disabling Fast Startup in Windows
While the Fast Startup feature can provide significant boost to startup times on computers using HDD drives, it has lesser impact on computers using SSD Drives.
Hence, if the Hard Disk on your computer is SSD type, you are not going to notice much difference in startup time, after disabling Fast Startup on your computer.
In case of computers with HDD Drives, you are likely to notice the delay in startup time. However, Disabling Fast Startup is justified, if it is causing problems on the computer.
Note: The Fast Startup feature is known to return back and get automatically enabled on the computer after a major Windows update.