If you are really looking for a distraction free period, you can enable “Do Not Disturb” mode on iPhone and totally prevent the possibility of anyone being able to call you during your selected distraction free period.
When iPhone is switched to “Do Not Disturb” mode, all incoming calls will be diverted to voicemail and all message alerts and notifications will be silenced and hidden from your view.
After the “Do Not Disturb” period ends or gets manually disabled, you will be able to take a look at all the calls and messages that you had missed during the “Do Not Disturb” period.
1. Enable “Do Not Disturb” Mode on iPhone
You can enable “Do Not Disturb” mode at any time on your iPhone by following the steps below.
1. Go to Settings > Focus > tap on Do Not Disturb.
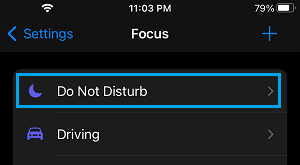
Note: If Do Not Disturb is not available, tap on the plus + icon (top-right) and select Do Not Disturb on the next screen.
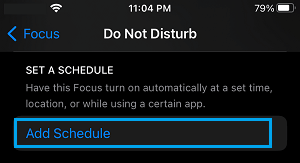
2. On the next screen, scroll down and select Add Schedule (or select an available Schedule).
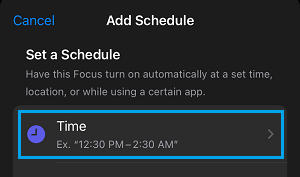
3. On Add Schedule screen, select the Time tab.
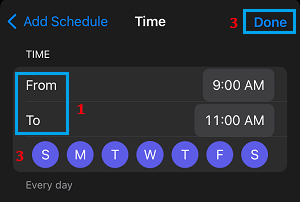
4. On the next screen, select the DND period (From and To), the Day or Days of the week during which you want the Do Not Disturb Schedule to run and tap on Done.
This will enable Do Not Disturb with default settings on your iPhone, which totally prevents calls, messages and other type of notifications from appearing on your device.
2. Allow Calls from Someone During “Do Not Disturb” Period
Unless you have changed it, the default setting on iPhone is to allow calls from Contacts that are marked as Favorites, even when your device is placed in “Do Not Disturb” mode.
Hence, all that is required to allow calls from someone or certain selected Contacts during “Do Not Disturb” period is to make or mark these Contacts as “Favorites” on your iPhone.
Another way to allow someone or certain Contacts to be able to make calls and send messages during “Do Not Disturb” period is by making use of “Emergency Bypass” feature as provided in this guide: Allow Someone to Bypass “Do Not Disturb” On iPhone.