You can protect sensitive, confidential and personal files/folders on your computer by hiding them and also by using the built-in Encryption tool, which is available in the Professional & Enterprise Edition of Windows.
While the Home Edition of Windows provides the option to Hide Files & Folders, it comes with a greyed out or disabled access to the built-in File Encryption tool, which is available in Windows Pro.
However, you can easily encrypt and password protect files and folders in the Home Edition of Windows by using free and open-source tools like 7-Zip and PeaZip.
Also, Word documents and Excel files can be protected in all versions/editions of Windows by using the built-in password protection feature, as available in Microsoft Word and Excel.
Encrypt & Password Protect Files/Folders in Windows 11/10
If you are using the Home Edition of Windows, the best way to encrypt and password protect files & folders is by using 7-Zip, which is open-source, free and widely used file archiver for Windows, macOS and Linux.
7-Zip features high-ratio file compression, uses strong AES-256 encryption and supports multiple file archive formats (7z, ZIP, TAR, RAR & others).
1. Password Protect Files Using 7-ZIP
The open-source File Protection tool (7-ZIP) is compatible with all versions of Windows and it is available for free download on its official website.
1. Download 7-ZIP on your computer from 7-zip.org.
2. Double-click on the downloaded (.exe) file and follow the steps to install 7-ZIP on your computer.
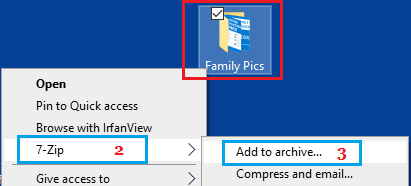
3. Right-click on the File/Folder that you want to protect > go to 7-ZIP and select Add to archive option.
4. On “Add to Archive” dialogue box, enter and re-enter the password that you want to use to protect this file or folder on your computer.
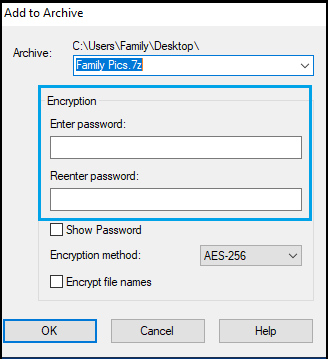
Note: The above screenshot has been modified to show only the password part of 7-ZIP.
5. You can stick to the default AES-256 encryption and click on OK to Enrcypt and password protect this file on your computer.
As you will notice, 7-ZIP will leave the original File/Folder intact and create a New encrypted and password protected copy of the original file.
Depending on your preference and the nature of file (sensitive, personal, confidential), you can keep the original file/folder in a protected location as a backup or delete it.
2. Password Protect Files Using Built-in Encryption
If you are using the Professional edition of Windows, you can protect any file or folder on your computer by using the built-in or native Encryption tool.
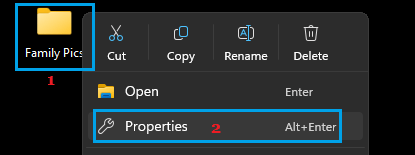
1. Right-click on the File/Folder and then click on Properties in the contextual menu.
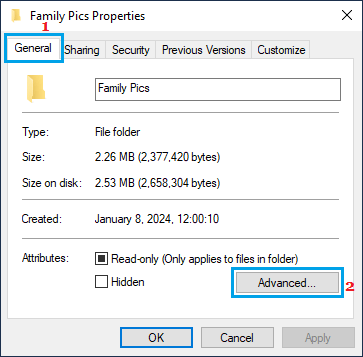
2. On the Properties screen, make sure you are on the General tab and click on Advanced button.
3. On “Advanced Attributes” screen, select Encrypt contents to secure data option and click on OK.
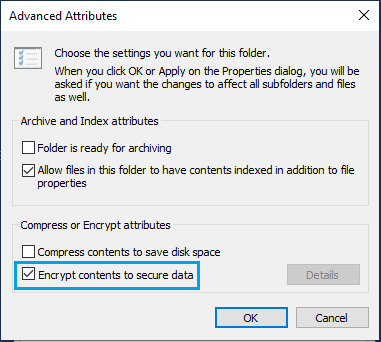
Note: If you are using the Home Edition of Windows, you will find “Encrypt contents to secure data” option greyed or not selectable.
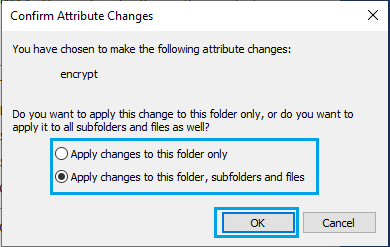
4. On the next screen, you can select the option to protect the Folder only or select Apply changes to this folder, subfolders and files option and click on OK.
5. Next, click on the Apply/OK option on the “File Properties” screen (see step 2).
Once the encryption process is completed (within seconds), this particular file will be encrypted and locked with your Windows User password.
3. Password Protect Files Using Paid Tools
If more features are required, you can make use of paid third-party tools to encrypt and password protect files on your computer.
Protected Folder: It has an easy to use interface and makes it really easy to add folders that you want to protect. You can either click on the Add button or just drag and drop folders into the program.
Folder Lock Lite: Another easy to use program, which provides the option to drag and drop Files, Folders and Drives to protection.
Folder Guard: Provides the option to use individual passwords for individual folders, instead of one master password. You can also assign specific access permissions for different user accounts on the computer.