In general, the problem of iPhone prompting users to verify their Apple ID with Repeated Apple ID Verification pop-ups occurs when iPhone is left unused and unlocked after a long period of inactivity.
Apart from this, the reason Repeated Apple ID pop-ups on iPhone could also be due to a software glitch, Apple ID not being recognized by Apple, change in Settings and other reasons.
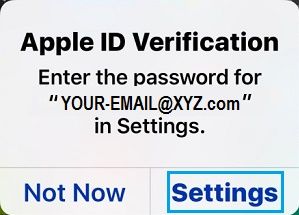
In a typical case, the pop-up goes away when users enter the password for their Apple ID, but it keeps returning back, every-time prompting users to verify their Apple ID.
Repeated Apple ID Verification Pop-ups on iPhone
If iPhone is constantly prompting you to verify your Apple ID, you should be able to fix the problem using the following methods.
1. Shut Down and Restart iPhone
As mentioned above, the problem could be due to a stuck app or processes and this can be fixed by restarting your device.
1. Restart iPhone by using the Power button
2. If Apple ID Verification pop-up returns, tap on Settings. (If not tap on Settings icon on the Home Screen).
3. From Settings screen, go to General > scroll down and tap on Shut Down.

4. Allow iPhone to completely Shut-down > Wait for 30 seconds and Restart your device by pressing the Power button.
2. Sign Out of iCloud
If the problem is due to a glitch in iCloud, signing out of iCloud and signing back in should fix the problem.
1. Open Settings > tap on your Apple ID Name.
2. On Apple ID screen, scroll down to bottom of the screen and tap on Sign Out.

3. Follow the instructions to Sign-out from iPhone.
4. Wait for 30 seconds and Sign in to your device.
Hopefully, this should fix the iCloud glitch causing repeated Apple ID Verification pop-ups on your iPhone.
3. Install Updates
The issue of repeated Apple ID Verification Pop-ups might be due to outdated software on your device.
1. Go to Settings > General > Software Update.
2. Allow iPhone to search for updates > tap on Install Updates (if an update is available).
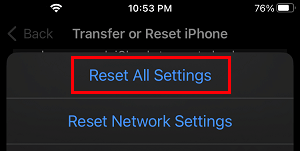
4. Reset All Settings
Make sure that you remember or note down your WiFi Password and follow the steps below to Reset All Settings on your device to Factory Default Settings.
1. Go to Settings > General > Transfer or Reset iPhone > Reset.
2. On the pop-up, select Reset All Settings option.
3. When prompted, enter your Lock Screen Password > On the confirmation pop-up, select the Reset option to confirm.
After the Reset Process is completed, you may no longer find your device prompting for Apple ID password.
5. Change Apple ID Password
Changing the password for your Apple ID might help in getting rid of the annoying Apple ID Verification pop-ups on your iPhone.
1. Open Settings > tap on your Apple ID Name.
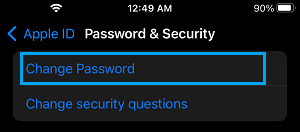
2. From the Apple ID screen, go to Password and Security > Enter your Apple ID Password.
3. On the Password & Security screen, tap on Change Password.
4. Answer the two security Questions to Verify your identity.
5. On the next screen, enter your Current Password, New Password and verify the New Password.
6. Backup iPhone and Perform DFU Mode Restore
If above methods did not help, the problem could be due to the firmware on your iPhone being corrupted.
To fix this issue, first make a backup of iPhone to Mac or Windows Computer and perform a DFU Mode Restore on your device.
This will completely erase all the software and data from your iPhone and reload the latest version of firmware and iOS operating system on your device.
Once the DFU Mode restore is completed, you will be able to Restore iPhone using the Backup that you made prior to the Restore Process.
7. Contact Apple
If your iPhone is still prompting you to verify Apple ID, the problem could be due to an issue with your Apple ID Account. This can only be fixed by someone at Apple Support.