The idea behind “iCloud Photos” feature on iPhone is to allow Apple device users to store photos on Apple’s iCloud servers and access them on any device, from anywhere in the World.
Once iCloud Photos is enabled on iPhone, photos that you take using the Camera on your iPhone get uploaded to your Photo Library on Apple’s iCloud storage service.
Advantages of Enabling iCloud Photos
The main advantage of enabling iCloud Photos on iPhone is that a copy of all your iPhone photos will be available on iCloud, even if your device is lost or stolen.
Another advantage of iCloud Photos is that it allows you to bypass the limited internal storage capacity of your iPhone by saving photos directly to iCloud.
For example, you can take as many photos as you want on iPhone, upload them to iCloud and delete them from your device to create storage space for more photos.
Enable iCloud Photos on iPhone or iPad
Since, Apple provides all iPhone users with 5 GB of free iCloud storage, you already have an iCloud Account that is linked to your Apple ID.
Hence, all that is required to enable iCloud Photos on iPhone is to Sign-in to your device and follow the steps below.
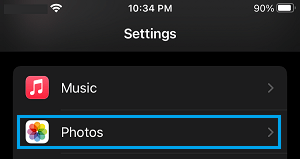
1. Open Settings > scroll down and tap on Photos.

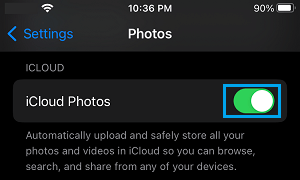
2. On the next screen, move the Slider next to iCloud Photos to ON position.

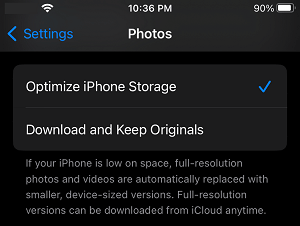
3. On the same screen, you can select Optimize iPhone Storage or Download and Keep Originals option.

Optimize iPhone Storage: If iPhone has less storage space, this default option replaces the full resolution original Photos on your device with compressed versions, optimized for storage.
Download and Keep Originals: When this option is selected, the original full resolution photos will be stored on iCloud and also on the internal storage of your iPhone.
After iCloud Photos is enabled on iPhone, your device will automatically start uploading photos to your iCloud Account, whenever it is connected to Wi-Fi and the Photos App is not being actively used.
Use Cellular Data to Upload Photos to iCloud
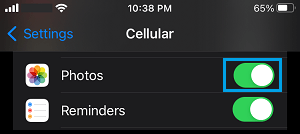
While the default option on iPhone is to use the Wi-Fi Network to upload photos to iCloud, you can setup your device to use Cellular Data to upload photos to iCloud, when Wi-Fi Network is not available.
Go to Settings > Cellular Data > move the toggle next to Cellular Data to ON position.

After this iPhone will be able to use cellular data to upload photos to iPhone, whenever Wi-Fi Network is not available.
Note: If you are on a Limited Data Plan, enabling cellular data for Photos App can end up being expensive.