When iPhone comes up with “SOS Only” badge at top-left corner of the screen, it means that your iPhone can only make calls to emergency phone numbers like 911 (US) or 999 (UK).
This also means that your iPhone is not capable of making Calls and sending iMessages and SMS Text Messages to regular phone numbers.
SOS Mode on mobile devices is only available in United States, Canada and few other Countries. If SOS Mode is not available, your iPhone may come up with No Service or Searching error message.
Why Does iPhone Switch to “SOS” Mode?
In general, an iPhone goes into “SOS” mode, when it loses contact with the Service providers network and ends up losing its cellular data connection.
This usually happens when you move to a new location that is outside the range or coverage area of your Service Provider’s Network.
Apart from this, iPhone can get stuck in SOS mode due to the SIM Card not being inserted properly, the SIM Card becoming damaged or corrupted and other reasons.
Fix SOS Only Mode on iPhone
If your iPhone has switched to “SOS Only” mode, you should be able to fix the problem using the following troubleshooting steps.
1. Enable Roaming Data
If you are outside the area of your Service Providers Network, you won’t be able to make calls unless data-roaming option is enabled on your device.
Before enabling data-roaming, you need to be aware that roaming charges can be excessive and even outrageous in certain cases.
1. Go to Settings > Cellular > Cellular Data Options.
2. On the next screen, move the toggle next to Data Roaming to ON position (Green).
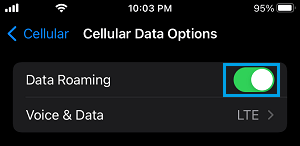
Once Data Roaming is enabled, you should be able to make regular phone calls and send text messages from your device using expensive roaming data.
2. Enable/Disable Airplane Mode
Enabling and Disabling Airplane Mode helps in refreshing the network and resetting wireless antennas on your device.
1. Open Settings > enable Airplane Mode by moving the toggle to ON position.
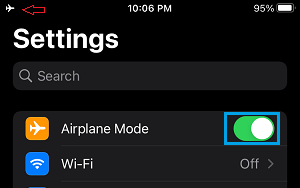
2. Wait for 30 seconds > Disable Airplane Mode by moving the toggle to OFF position.
3. Switch to 4G or LTE Network
If you are using 5G Network, the problem might be due to 5G network not currently being available in your area.
1. Go to Settings > Cellular > Cellular Data Options > Voice & Data .
2. On the next screen, select LTE or any non 5G Network.
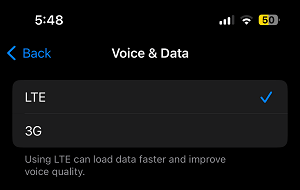
After this, take a look at top-left corner of the screen to see if your device is out of SOS mode.
4. Disable Automatic Network Selection
Sometimes, the problem is caused due to iPhone being unable to automatically connect to the Service Providers Network.
1. Go to Settings > Cellular > Network Selection.
2. On the next screen, move the toggle next to Automatic to OFF position.
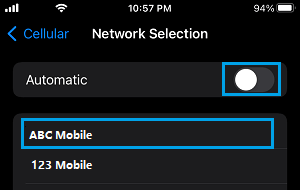
3. After disabling Automatic Network selection, wait for available Networks to appear on the screen and select your Service Provider’s Network.
5. Remove and Reinsert SIM Card
It is possible that your iPhone has lost contact with the Service Providers network due to its SIM Card being displaced, becoming faulty or damaged.
To check, remove the SIM Card from your iPhone and inspect the SIM Card for visible signs of damage.
If you do not find signs of damage, reinsert the SIM Card back into iPhone and see if the problem is now fixed.
6. Install Updates
The problem might be due to an iOS or Carrier update waiting to be installed on your device.
1. Go to Settings > General > Software Update.
2. Allow iPhone to check for updates > follow the prompts to download and install updates (if they become available).
7. Reset Network Settings
If above methods did not help, the problem could be due to Network Settings on your device becoming corrupted.
You can fix this issue by performing a Network Settings Reset on your device.
If the problem is still not fixed, it is time to get in touch with your Wireless Carrier and see if their technical service department can help in fixing the problem.