Mobile or Cellular data is expensive in certain Countries, which makes many users to go for Phone Plans that offer Talk & Text with a limited amount of free data, instead of spending their hard earned money on expensive Unlimited Data plans.
Depending on terms & conditions of the Phone Plan, exceeding the Data Limits can either cut you off from mobile data till the end of current billing period or allow you to buy additional data at very high rates.
In both cases, it becomes necessary to keep an eye on the amount of data being used and take precautions to reduce the amount of cellular data being used on iPhone.
Monitor & Reduce Data Usage on iPhone
The first step that is required to make the best use of a Limited Data plan is to setup or configure iPhone to measure the amount of data being used in a Billing cycle and get into the habit regularly monitoring the data being used on iPhone.
The next step would be to implement a suitable data saving strategy that can conserve data usage on your iPhone and allow you to manage your day-to-day activities, without the need to buy additional data.
For example, if your phone plan provides you with a fixed number of calls and very small amount of data, the matching data saving strategy would be to keep cellular data switched-off most of the times and make use of free Wi-Fi networks to perform most of your day-to-day activities.
In other cases, disabling cellular data usage for non-essential apps/services and allowing only the required apps and services to use cellular data would be an effective data saving strategy.
1. Set iPhone to Monitor Data Usage in a Billing Cycle
In order to accurately measure the amount of data being used on iPhone, the first step is to set up your device to accurately monitor the amount of data being used in a Billing cycle.
At the beginning (Day 1) of your billing cycle, go to Settings > Cellular > scroll down to bottom of the screen and tap on Reset Statistics.
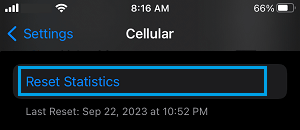
On the confirmation pop, tap on Reset Statistics to confirm.
This step ensures that iPhone is measuring Data from the First Day to Last Day of the Billing cycle.
Note: At the end of Billing cycle, remember to tap on Reset Statistics to clear the previous month’s data usage.
2. Check Cellular Data Usage on iPhone
After setting up your device to measure data in a Billing cycle, you need to get into the habit of regularly checking the amount of cellular data being used on your iPhone.
Go to Settings > Cellular > scroll down to “Cellular Data“ section and take a look at the figure next to Current Period entry.
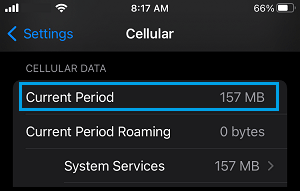
In the same section, you can see which Apps are consuming the most amount of data on your iPhone and switch them off (If necessary).
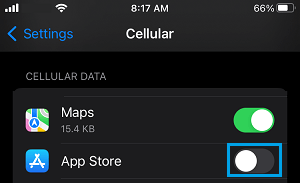
3. Prevent Specific Apps from Using Cellular Data
On a Limited Data plan, it is important that you learn to relay on free Wi-Fi Networks as much as possible and provide cellular data access to only the most essential apps on your iPhone.
Go to Settings > Cellular > scroll down to “Cellular Data” section and switch OFF all non-essential apps that should not be using cellular data on your iPhone.
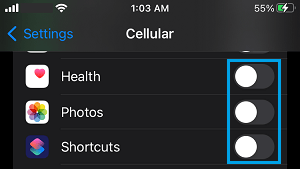
Note: Make sure that you tap on Show All to reveal all the apps using data on your iPhone.
4. Disable Wi-Fi Assist
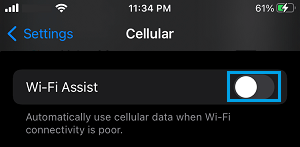
The “Wi-Fi Assist” feature has often been linked to excessive cellular data and battery usage on iPhone.
Go to Settings > Cellular > scroll down and disable Wi-Fi Assist by moving the slider to OFF Position.
5. Disable Cellular Data for Downloads
Make sure that apps and updates on your iPhone can only be downloaded by using Wi-Fi Network.
Go to Settings > Cellular > scroll down to “Cellular Data” section and disable cellular data for the App Store by moving the slider to OFF position.
After this, your iPhone will download iOS and App Updates; only when it is connected to a Wi-Fi Network.
6. Disable Cellular Data for Photos
Photos & Videos can end up consuming a lot of data. Hence, it is important that you prevent the Photos App from using cellular data to upload or share photos.
1. Go to Settings > Apps > Photos > scroll down and tap on Cellular Data.
2. On the next screen, disable Cellular Data for Photos by moving the slider to OFF position.

7. Enable Background App Refresh Using Wi-Fi Only
You can expect to save a good amount of Mobile Data by preventing all the Apps from using cellular data for background activities on your iPhone.
Go to Settings > General > Background App Refresh > select the Wi-Fi option.
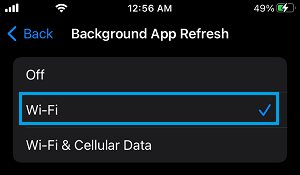
After this all the Apps on your iPhone will only be allowed to use Wi-Fi network for Background activities.
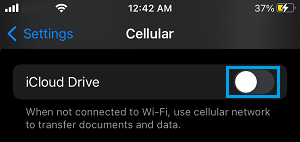
8. Disable Cellular Data for iCloud
Make sure that all documents and data transfer activities between iPhone and iCloud are only made using your free Wi-Fi Network.
Go to Settings > Cellular > scroll down and disable cellular data for iCloud Drive by moving the slider to OFF position.
9. Completely Disable Cellular Data on iPhone
As mentioned above, you can keep cellular data switched OFF most of the times for all the apps and services on iPhone and enable cellular data usage only when it becomes necessary to use mobile data.
Go to Settings > Cellular > move the slider next to Cellular to OFF position.
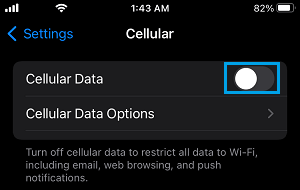
Note: This setting does not in any way prevent you from making calls and sending text messages using the network of your phone service provider.