In general, the “Thread Stuck in Device Driver” error also known as BSOD (Blue Screen of Death) is caused in Windows 10/11 due to the device driver getting stuck in an endless loop, waiting for the device to settle down or become idle.
This can happen due to the device driver becoming outdated, faulty, corrupted or becoming incompatible with the operating system.
In certain cases, “Thread Stuck in Device Driver” error can also be caused due to corrupted files and damaged sectors or errors in the Hard Disk of the computer.
Thread Stuck in Device Driver Error in Windows 10/11
If your Windows 11/10 Laptop or Desktop computer is stuck on THREAD STUCK IN DEVICE DRIVER Error, you should be able to fix the problem using the following troubleshooting steps.
1. Power Off and Restart
Press the Power button to shut down the computer > Allow the computer to completely shut-down > wait for 60 seconds and Restart the computer.
This simple troubleshooting step might fix the problem, if it was being caused due to a stuck program/process on your computer.
2. Update Drivers
Sometimes, the problem is due to the Device Drivers on your computer not being properly loaded or updated.
1. Right-click on the Start button and click on Device Manager.
2. On Device Manager screen, click on Action and select Scan for Hardware Changes in the drop-down menu
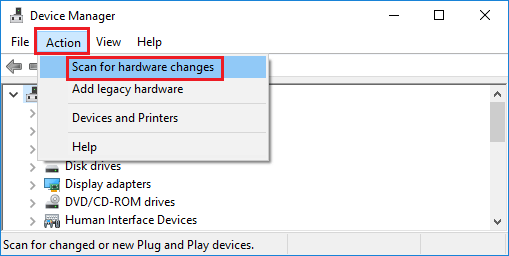
Windows will scan your computer for Hardware changes and update drivers (if required).
3. Manually Update Graphics Card Driver
1. Right-click on the Start button and click on Device Manager.
2. On the Device Manager screen, expand Display Adapters > right-click on the listed Graphics Driver and click on Update driver.
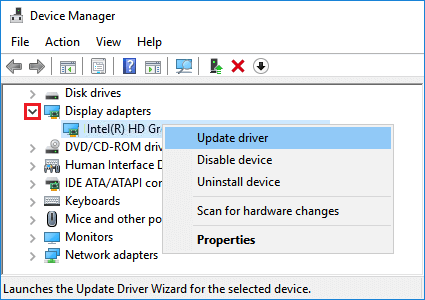
3. On the next screen, select Search automatically for updated driver software option.
4. Follow the onscreen instructions to update the Driver.
After updating the Graphics Card Driver, Restart the computer and see if the problem is now fixed.
4. Download Updated Driver from Manufacturers Website
If Windows is unable to find the driver, visit Manufacturers website (NVIDIA, AMD, etc.) and see if an updated driver is available.
If a driver is available, download the driver software file on your computer > double click on the downloaded File and follow instructions to install the updated driver on your computer.
5. Run SFC Scan
1. Type Command Prompt in the Search bar > right-click on Command Prompt and select Run as Administrator option.

2. On Command Prompt screen, type sfc /scannow and press the Enter key to execute this command.
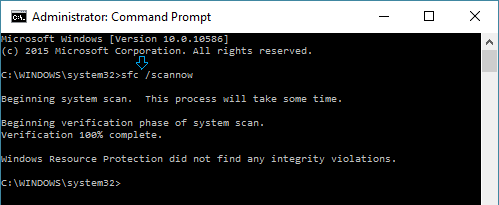
3. Patiently wait as Windows tries to scan and fix the corrupted system files on your computer.
6. Run DISM
Deployment Image Servicing and Management (DISM) is a tool that re-installs the system image on your computer.
1. Open the Command Prompt as Admin.
2. Type DISM /Online /Cleanup-Image /RestoreHealth and press the Enter Key.
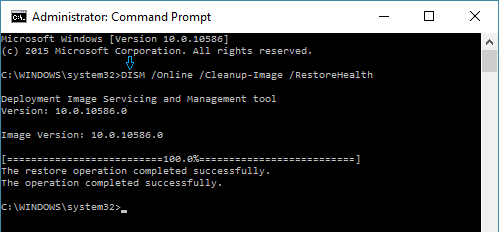
3. Patiently wait for the process to be completed.
4. Close the Command Prompt windows and Restart the computer.
7. Check Hard Disk for Errors
As mentioned above, the problem can also be caused due to corrupted or damaged sectors in the Hard Disk.
1. Open Command Prompt as Admin.
2. On the Command Prompt screen, type ckkdsk /r c: and press the Enter Key.
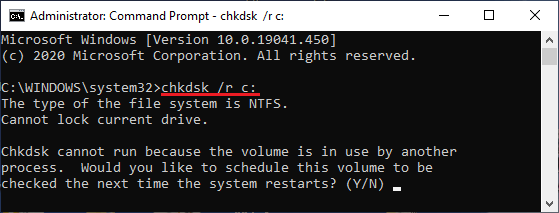
3. Wait for the process to be completed.
4. Close the Command Prompt screen and restart the computer.
8. Update BIOS
In certain cases, the problem can be fixed by updating BIOS (Basic Input and Output System) or UEFI (Unified Extensible Firmware Interface) firmware.
You can find the exact steps to update BIOS in this guide: How to Update BIOS in Windows 10.
9. Increase GPU Processing Time Using Registry Editor
This method involves making changes to the Registry and is only meant for advanced users. Hence, it is recommended that you backup the Registry Files on your computer and also backup the data on your computer.
1. Right-click on the Start button and click on Run.
2. In Run Command window, type regedit and click on OK.

3. On Registry Editor screen, navigate to HKEY_LOCAL_MACHINE\SYSTEM\CurrentControlSet\Control\GraphicsDrivers.

4. Click on GraphicsDrivers folder in the left pane. In the right-pane, create a new DWORD by right-click in any Blank space > New > DWORD (32-bit) Value.
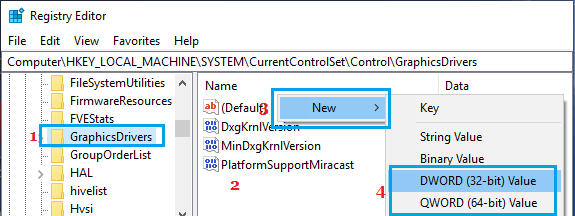
Note: You can choose DWORD(64-bit) if the OS on your computer is 64-bit.
5. Name the newly created DWORD as TdrDelay.
6. Double-click on TdrDelay and type8 as the “Value Data” in Edit DWORD pop-up.

7. Click on OK to save this change to the Registry.
Close the Registry Editor and restart the computer to apply this change.