A User Group in Windows operating system can be defined as a Group or Collection of multiple User Accounts governed by the same or common set of privileges and security settings.
To explain this, we can take the case of free access or common Home Computer that has separate User Accounts for children, teens and adults with limited privileges.
Now, instead of having to manage these accounts individually, you can Add these User Accounts to a User Group and manage these accounts at a Group Level.
Purpose of Creating User Groups in Windows
As you must have already realized, the main purpose of creating User Groups in Windows is to simplify the process of managing multiple users in a large and complex computing environment.
For example, any large or medium sized company that makes use of Windows computers to run or manage its business will have multiple departments, sections, project groups using a large number of workstations and mobile computers.
In such a complex scenario, System Administrators can make use of the User Group feature in Windows to simplify the process of managing multiple computer users belonging to different departments, sections and project teams.
Instead of manually configuring settings for New User Accounts, System Admins can simply add New Employees to Existing User Groups and this way New User Accounts will automatically inherit the privileges and security settings of their assigned User Group.
Similarly, whenever any change in privileges or security settings is required, the System Admins will be able to make the changes at a Global or Group Level, instead of manually changing settings for each and every individual user account.
How to View, Edit, Manage User Groups
In order to View, Edit or Manage existing user Groups, you need to be logged in with an Admin User Account.
In a Group scenario, Network Administrators are usually placed in Admin User Group and any Network Administrator with a User Account in the Admin Group will be in a position to View, Modify and Manage other Users Groups
Find the User Group to Which Your Account Belongs
Follow the steps below to find out whether or not you belong to a User Group and to which User Group your User Account belongs to.
1. Login to your computer with your User Name and Password.
2. Right-click on Start button and click on Command Prompt (Admin) in the menu that appears.

3. On the Command Prompt screen, type gpresult /r and press the Enter key on the keyboard of your computer.

Once the gpresult command is executed, you will be able to see your User Account and the User Group to which your User Account belongs to on the command prompt window.
Note: gpresult command does not work on Home Edition of Windows, it only works on Pro and Enterprise versions of Windows 11/10.
Home Edition users can make use of “net user” command to find out their User Group
1. Open Command Prompt As Admin.
2. On the Command Prompt screen, type net user “User Name” and press the Enter key on the keyboard of your computer.
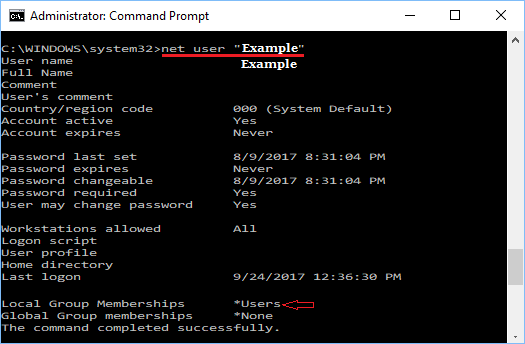
3. Once “net user” command is executed, you will be able to see the Group to which your User Account belongs.
How to View All User Accounts in User Groups
In case you are dealing with a large number of user accounts, you can view details of all the User Accounts by using “WMIC UserAccount” Command on your Windows computer.
1. Open Command Prompt As Admin.
2. On the Command Prompt screen, type wmic useraccount list full and press the enter key on the keyboard of your computer.
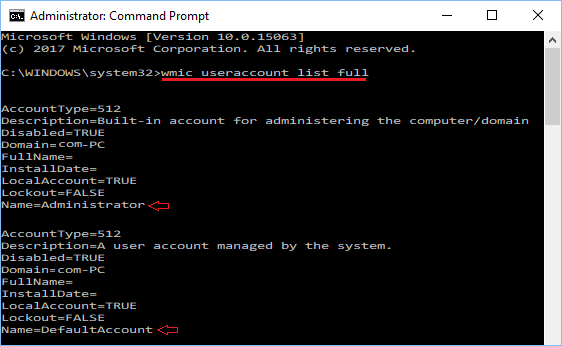
3. Once the command is executed, you will be able to see all the User Accounts listed on the Command Prompt screen.
How to Create User Groups in Windows 11/10
You can follow the steps below to create a New User Group on your Windows computer.
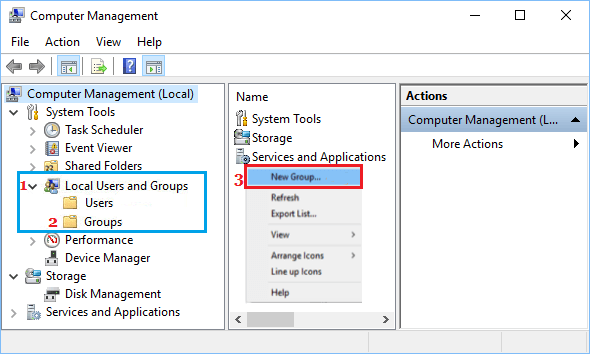
1. Right-click on Start button and click on Computer Management entry in the menu that appears.
2. On Computer management screen, click on Local Users and Groups. Next, right-click on Groups, and then click on New Group option in the menu that appears (See image below).
3. In the New Group dialog box, type the Name of the New Group that you want to create, provide a Description and you can also Add members to this New Group.
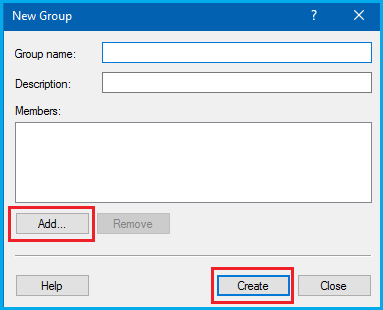
4. Click on the Create button.