In most cases, the problem of Weather App not working properly or not being able to bring up updated and accurate weather related information is related to the Weather App not being provided with access to Location data. In addition to this, the Time & Date settings on iPhone can prevent Weather App from providing accurate Weather data; especially while travelling.
Weather App Not Working Properly on iPhone
You can find below the steps to fix the issue of Weather App not working properly and improve the accuracy of iPhone Weather App.
1. Enable Location Services
A common reason for the Weather App not providing accurate information is due the Location Services feature being disabled on iPhone, in order to conserve battery life.
1. Go to Settings > Privacy & Security > tap on Location Services.
2. On the next screen, make sure Location Services is enabled.
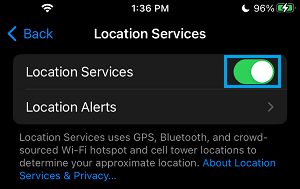
On the Location Services screen, you can find Apps that have been provided with access to your Location Data.
2. Allow Weather App to Access Your Location
Even if the Location Services feature is enabled on iPhone, the Weather App needs to be specifically provided with access to your Location information.
1. Go to Settings > Apps > Weather > tap on Location.
2. On the Location screen, select Always or While Using the App option.
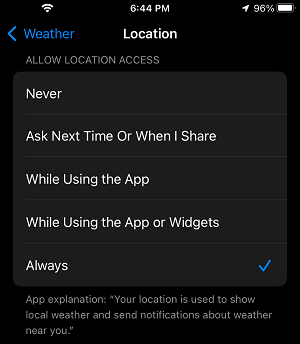
Note: Selecting “Always” is particularly useful while travelling; because your current location can change.
3. On the same screen, you can enable the Precise Location option to further improve the accuracy of the Weather App on your iPhone.
3. Check Time & Date Settings
If you are travelling across different time-zones, it is important to make sure that iPhone is allowed to automatically set its Date and Time.
1. Go to Settings > General > scroll down and tap on Date & Time.
2. On the next screen, make sure Set Automatically option is enabled.
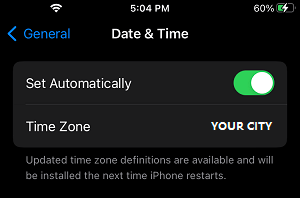
According to Apple, allowing iPhone to automatically adjust its Date/Time is a part of maintaining the overall accuracy of GPS/Location Services features on iPhone.
4. Allow Weather App to Use Cellular Data
If your phone plan provides a good amount of data, you can allow the Weather App to always keep itself updated by using mobile data.
1. Go to Settings > Cellular > scroll down and tap on Show All.
2. On the next screen, move the toggle next to Weather to ON position.
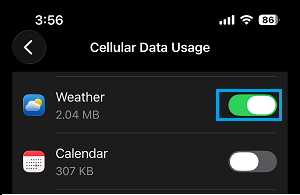
This will ensure that the Weather App can make use of cellular data to update itself; while you are travelling and far away from a trusted Wi-Fi network.
5. Switch ON Weather Notifications
Make sure that the Weather App is allowed to send Notifications on your iPhone; so that it can keep you up-to-date with latest Weather related information.
1. Open the Weather App on your iPhone.
2. Tap on 3-Dots Icon and then tap on Notifications.
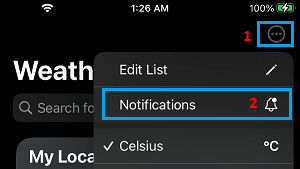
This will ensure that the Weather App has the permission to provide you with timely Weather related Notifications.
6. Install Updates
Make sure that your iPhone is upto-date with the latest iOS and App updates.
1. Go to Settings > General > Software Update.
2. Wait for iPhone to check for updates > tap on Download & Install link (if an update is available).
7. Delete Weather App and Reinstall It Back Again
If the problem is still not fixed, you can delete the Weather App and reinstall it back on your device. This can help, if the problem is due to installation of the Weather App on your iPhone being damaged or corrupted.
1. Locate the Weather App on the Home Screen of your iPhone.
2. Long Press (Tap and hold) on the Weather App and select the Remove App option.
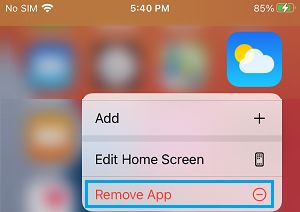
3. On the confirmation pop-up, tap on the Delete App option to confirm.
4. After deleting the Weather App, open App Store > search for Weather App and reinstall the Weather App on your iPhone.