An easy way to transfer or send Photos, Contacts and Files from iPhone to another iPhone or Mac is to use the AirDrop feature as available on your iPhone.
In addition to Photos, AirDrop can be used to wirelessly transfer Contacts, Notes, Calendar, PDF and other types of Files from iPhone to another iPhone and other Apple device (iPad or MacBook).
AirDrop Files, Photos From iPhone to iPhone and Mac
The AirDrop feature makes use of Bluetooth technology to identify nearby Apple devices and Wi-Fi Network to transfer Photos, Videos and Files between the two Apple Devices.
Hence, the first requirement is make sure that both sending and receiving devices are connected to Wi-Fi and Bluetooth Networks.
After this, the AirDrop feature needs to be enabled on both the sending (iPhone) and receiving device, which could be another iPhone, iPad or MacBook.
Step 1. Enable Wi-Fi/Bluetooth on Both Devices
If you are like most users, it is very likely that your iPhone and other Apple devices are already connected to Wi-Fi, but they may not be connected to Bluetooth.
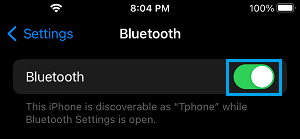
On iPhone: Go to Settings > Bluetooth > Make sure Bluetooth is enabled.
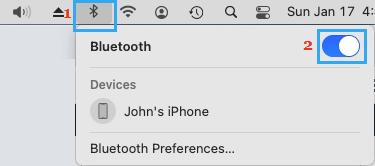
On Mac: Click on Bluetooth Icon located in the top menu-bar (top-right corner) > enable Bluetooth in the drop-down menu.
Note: As mentioned above, both sending and receiving devices need to be connected to Wi-Fi.
Step 2. Enable AirDrop on iPhone and Receiving Device
The next step is to enable AirDrop on both the sending (iPhone) and receiving devices (MacBook).
On iPhone: Go to Settings > General > Airdrop > select the Everyone option.
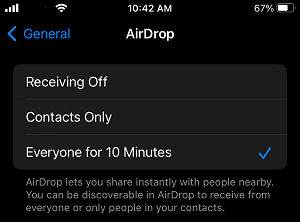
Note: It is better to select Everyone as it is known to prevent AirDrop problems and it also allows you to use AirDrop without being signed into Apple ID
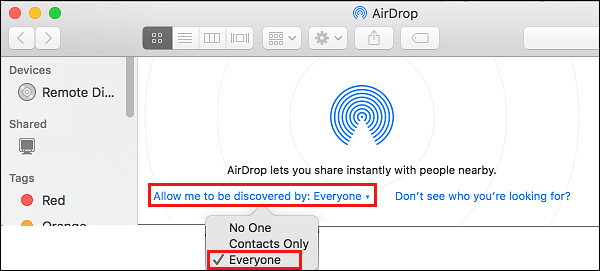
On MacBook: Open the Finder on your Mac > click on the Go tab in top-menu bar and select AirDrop in the drop-down menu.

On the AirDrop screen, click on Allow me to be Discovered by option and select Everyone from the drop-down.
Note: If iPhone is not listed, unlock iPhone by entering its Lock Screen Passcode.
How to AirDrop From iPhone to Other Apple Devices
After configuring AirDrop on both sending (iPhone) and Receiving (Mac or another iPhone) devices, you are all setup and ready to wirelessly transfer Files, Photos, Notes from iPhone to Mac using AirDrop.
All that is required to AirDrop from iPhone to another iPhone or Mac is to open the Photo, File or Note that you want to transfer, tap on the Sharing Icon and select the AirDrop option in the Sharing menu.
For better understanding, let us go ahead and take a look at the steps to transfer photos from iPhone to another iPhone and Mac.
1. AirDrop Photos from iPhone to iPhone
You can follow the steps below to AirDrop Photos from iPhone to another iPhone.
1. Open the Photos App on your iPhone (Sending device).
2. Select Photos that you want to AirDrop and tap on the Share icon located in the bottom menu.
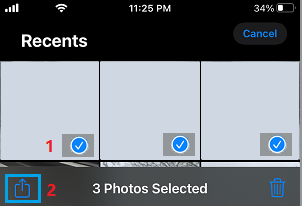
3. From the Sharing menu that appears, select the AirDrop option.

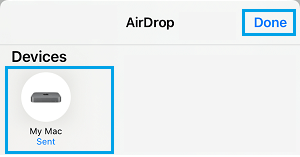
4. On the next screen, select the iPhone (Receiving device) to which you want to send photos.

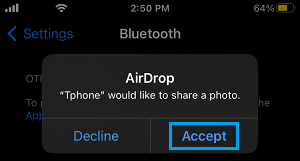
6. On the Receiving device, you will see an AirDrop pop-up > Tap on Accept to receive Photos from the sending device.
Once you tap on Accept, you will see Photos from the sending device appearing on the receiving iPhone.
2. AirDrop Photos from iPhone to Mac
You can follow the steps below to AirDrop Photos from iPhone to Mac.
1. Open the Photos App on your iPhone (Sending device).
2. Select Photos that you want to AirDrop and tap on the Share icon located in the bottom menu.
3. From the Sharing Menu that appears, select the AirDrop option.
4. On the next screen, select the Device (Your Mac) to which you want to transfer Photos.
The selected Photos will be immediately transferred to your Mac and they will be available in the Downloads Folder on your Mac.
AirDrop Photos Not Showing on Mac
If Photos are not being transferred from iPhone to Mac, you can follow the steps below to fix the problem.
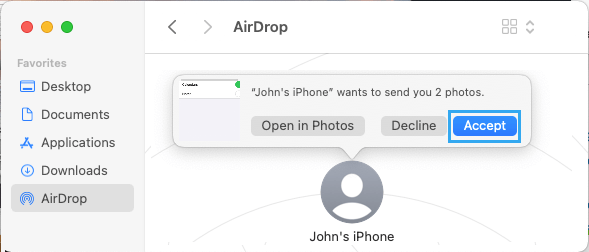
1. Click on the Finder Icon > select Go tab in top-menu bar and click on AirDrop.
2. On the next screen, click on Accept to allow File Transfer between iPhone and Mac.
If you are still having problems, refer to these guides: Fix: AirDrop Not Working on Mac and Fix: AirDrop Not Working on iPhone.