While it is really easy to manually clear the Recycle Bin, you can also set up your computer to automatically clear the Recycle Bin on a daily or weekly basis.
This way you can prevent deleted files from taking up storage space on the computer and also prevent the possibility of sensitive or confidential files remaining available in the Recycle Bin.
Automatically Clear Recycle Bin in Windows 11/10
If you like the idea of automatically clearing the Recycle Bin on a daily or weekly basis, you can make use of “Storage sense”, which provides the option to clear the Recycle Bin after a set period of time.
If you are mainly concerned about deleted files being available in the Recycle bin, you can setup Windows to automatically remove deleted files from the computer, instead of keeping them in the Recycle bin.
This way you can totally rule out the possibility of sensitive or confidential deleted files being available on the computer, even after they are deleted.
1. Automatically Clear Recycle Bin
As mentioned above, the “Storage Sense” feature in Windows can be configured to automatically clear the Recycle bin after a set period of time (Day, Week, Month & other available periods).
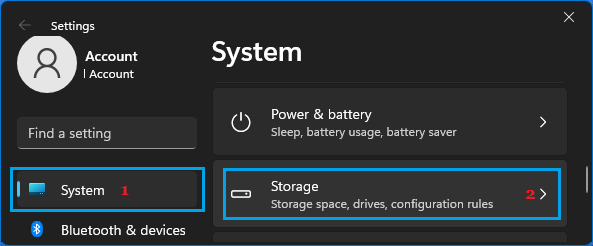
1. Press Win + I keys to open the Settings menu on your computer.
2. On the Settings screen, select System in the left-pane and click on Storage in the right-pane.
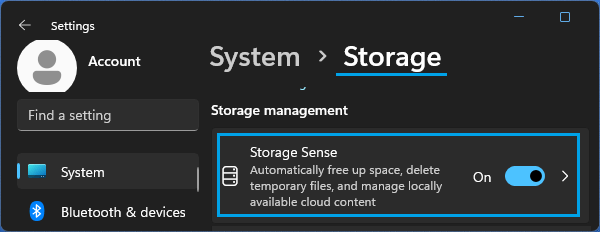
3. On the next screen, move the Slider next to Storage Sense to ON position and click on Storage sense.
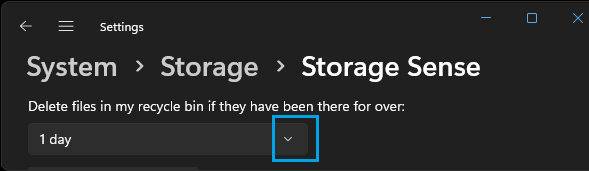
3. On “Storage Sense settings” screen, set Delete files in my recycle bin…. option to 1 Day, 1 Week or any other period that suites your requirements.
Windows 10: Go to Settings > System > Storage > click on Configure Storage Sense or run it now link and select your desired auto-clearance period.
After this, you can expect deleted files to be automatically cleared from the Recycle Bin, after your selected period of auto-clearance time.
2. Automatically Remove Deleted Files from the Computer
You can also setting up Windows to automatically remove deleted files from the computer, instead of moving them to the Recycle Bin.
1. Right-click on the Recycle Bin icon located on the Desktop and click on Properties.

2. On Recycle Bin Properties screen, select Don’t move files to Recycle Bin option.
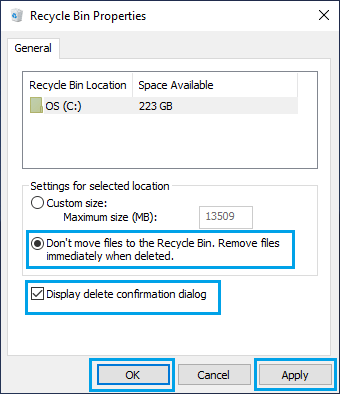
Note: You can also check Display delete confirmation dialog option, to make the computer come up with a confirmation pop-up, whenever you try to delete files from the computer.
3. Click on Apply and OK to save this setting on your computer.
After this, deleted files will be immediately removed from the computer and you will no longer find deleted files still remaining accessible in the Recycle bin.
Note: Even with this setup, you can prevent the possibility of important files being accidentally deleted from the computer by selecting “Display delete confirmation dialog option.