It is easy to Backup iPhone to iCloud and also download a complete Backup of your device to Mac or Windows computer. You can find below different methods to Backup iPhone.
Backup iPhone to iCloud And Computer
Over a period of time your iPhone will end up accumulating tons of Photos, Videos, Messages, Contacts and other data on its internal storage.
All these accumulated Messages, Photos, Contacts and data can be lost, if iPhone is Lost or Stolen, gets damaged and also if the software/firmware on your device becomes corrupted.
Hence, the need to Setup iPhone to automatically backup its data to iCloud and download a complete backup of iPhone on your computer.
Once a Backup of your iPhone is available, it can be used to recover lost data on your device by Restoring iPhone from iCloud Backup or by Restoring iPhone from Backup on Computer.
1. Setup Automated iCloud Backups
Apple provides iPhone users with 5 GB of Free iCloud Storage Space, which can be used to setup Automated iCloud Backups.
All that is required to make iPhone to automatically backup its data to iCloud is to open Settings > tap on your Apple ID Name > iCloud > iCloud Backup and move the slider next to iCloud Backup to ON position.
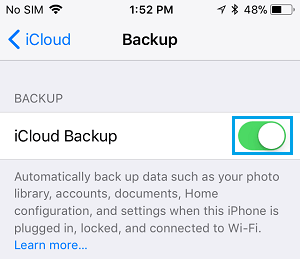
After this, iPhone will start automatically backing up all its Essential data to iCloud, whenever it is plugged in for charging and connected to WiFi Network.
2. Manually Backup iPhone to iCloud
At anytime, you can initiate a manual backup of of your device to iCloud by going to Settings > Apple ID > iCloud > iCloud Backup and tapping on Back Up Now option.
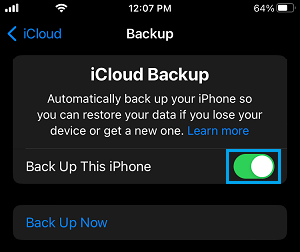
Patiently wait for the Backup process to be completed. Make sure that you do not close your device or interrupt the backup process in any way.
What is Included in An iCloud Backup?
According to Apple, an iCloud Backup contains almost all the data that is stored on your device, but it does not include any data that is already available on iCloud.
This clearly means that an iCloud Backup does not include Apps, Music, iMessages, Health Data, Notes, Contacts, Calendars, Books and iCloud Photos.
All Photos and Videos stored on the physical storage of your iPhone will be saved and available for restore in an iCloud Backup.
If you are looking for a complete Backup of iPhone, you need to download a backup of your device on Mac or Windows PC by using methods 3 & 4 as provided below.
3. Download iPhone Backup to Mac
You can download a complete backup of your device to Mac by following the steps below.
1. Connect iPhone to Mac and click on the Finder icon.
![]()
2. Select your iPhone in the left pane. In the right-pane, scroll down to “Backups” section > select Backup all the Data on your iPhone to this Mac option and click on Back Up Now button.
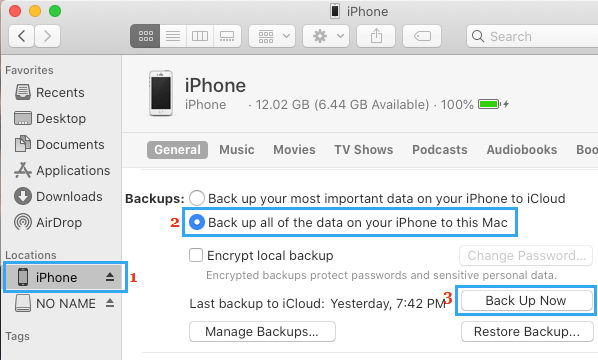
Patiently Wait for the Backup process to be completed. The time to complete the backup will depend on the amount of data available on your iPhone.
4. Download iPhone Backup to Windows Computer
Make sure that you have the latest version of iTunes installed on the computer and follow the steps below to download a complete backup of your device to Windows computer.
1. Connect iPhone to computer > Launch iTunes (if it does not automatically start) and click on the Phone icon, as it appears in iTunes.
![]()
2. Next, select the Summary tab in left-pane. In the right-pane, scroll down to “Backups” section, select This computer option and click on Back Up Now button.
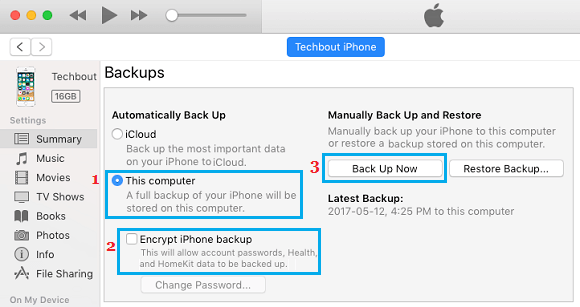
Once you click on Back Up Now, iTunes will start the process of downloading a complete backup of your device to computer.
Patiently wait for the backup process to be completed. Make sure that you do not pull out iPhone from the computer or interrupt the backup process in any way.
Note: You can check Encrypt iPhone Backup option, if you also want to save Passwords, Health and Activity Data.
If you select Encrypted Backup, you will be prompted to setup a password to access Encrypted Backups.
You need to make sure that you remember and write down this password. You won’t be able to access the Encrypted backup without entering this password.
What is Included in Downloaded Backup of iPhone to Computer?
When you download a complete backup of iPhone to PC or Mac, it includes almost all the data that is available on your iPhone, including all Photos, Videos, Messages, Contacts, Calendar, Third-part Apps and Health Data.
App Store Apps, Music, Movies, Podcasts, Ringtones and Books are not included in an iTunes Backup as they can be downloaded from the App Store.
However, you can also transfer items purchased from iTunes and App Store to iPhone by connecting your device to computer and launching iTunes.
Once iPhone appears in iTunes, click on File > Devices > Transfer Purchases from iPhone.
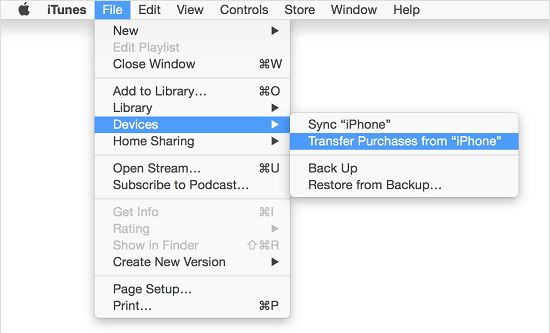
All your purchases made from iTunes and the App Store will be transferred to your device.