If you are unable to install the Google Chrome browser on your computer, you should find Windows coming up with an error message indicating the reason for Google Chrome failing or not being allowed to install on the computer.
For example, if you are trying to install Google Chrome on a computer in S-Mode, you should see Windows coming up with “Can’t install Chrome because you’re in S mode” error message.
If this is not the case, you may see an error message reading “Google Chrome is already installed…”, which indicates the presence of an incomplete or corrupted version of Google Chrome on the computer.
Unable to Install Google Chrome in Windows 11/10
As mentioned above, Windows usually comes up with an error message providing the most likely reason for its failure to install Google Chrome on the computer.
Depending on the error message, you can select from the following methods to fix the problem of Google Chrome not downloading or failing to install on your computer.
1. Switch OFF S Mode
If your computer is coming up with “Can’t install Chrome because you’re in S mode” error message, it confirms that the problem is due to the computer being in S-Mode (Security Mode).
In this case, the only way to download and install Google Chrome browser on your computer is by disabling S Mode, using steps as provided in this guide: How to Switch OFF S Mode in Windows 11.
After disabling S Mode, you should be able to download and install the Google Chrome browser on your computer; without encountering any error messages.
2. Enable Installation of Third Party Apps
If your computer is not in S Mode and you are still unable to Install Google Chrome, the problem could be due to installation of third-party apps being blocked on your device.
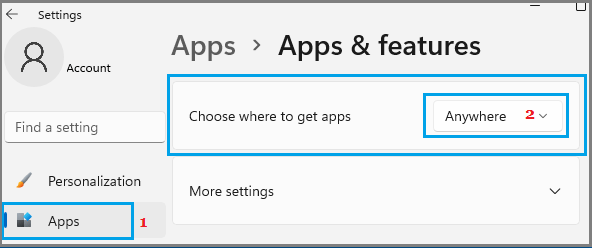
1. Open Settings > select Apps in the left-pane and click on Apps & Features in the right-pane.

2. On “Apps & Features” screen, click on the Down Arrow next to “Choose where to gets Apps” entry and select Anywhere or Warn while installing Non Microsoft Apps option.
After this, you should be able to Install the Google Chrome browser on your computer.
Windows 10: Go to Settings > Apps > Apps & Feature > In the right-pane, select Anywhere or Warn while installing Non Microsoft Apps option.
3. Reinstall Google Chrome
If you are looking at an error message reading “Google Chrome is already installed on your computer”, the solution is to remove the corrupted installation of Google Chrome from the computer and install the latest available version of Google Chrome on the computer.
For the steps to remove & reinstall Google Chrome, you can refer to this guide: How to Reinstall Google Chrome on PC and Mac.
4. Delete Chrome Client Registry Entry
If you are looking at “Can’t find installer applications on Windows” message, the solution is to delete “Chrome related registry key” from the computer.
1. Right-click on the Start button and click Run.
2. In the Run Command window, type regedit and click on OK.

3. On the Registry Editor screen, navigate to HKEY_LOCAL_MACHINE\SOFTWARE\WOW6432Node\Google\Update\Clients
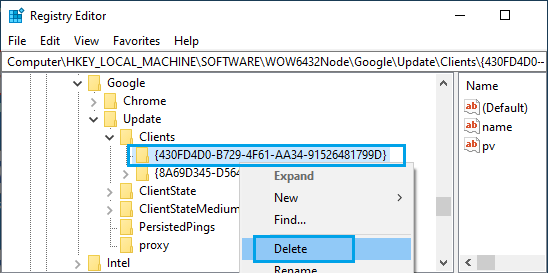
Right-click on 430FD4D0-B729-4F61-AA34-91526481799D folder and select the Delete option.
4. Close the Registry Editor and try to download/Install Google Chrome on your computer.
5. Enable Background Intelligent Transfer Service
Another reason for installation of Google Chrome browser failing on a Windows computer is due to Background Intelligent Transfer Service (BITS) being disabled.
1. Right-click on the Taskbar and click on Task Manager.

2. On the Task Manager screen, switch to the Services tab and make sure Background Intelligent Transfer Service is running.
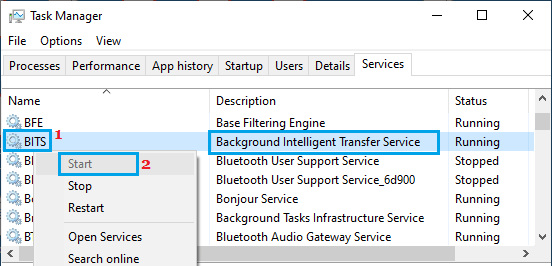
If Background Intelligent Transfer Service (BITS) is not running, right-click on BITS and select the Start option.