Apple prompts users to provide an Email Address during the setup process of an iPhone, iPad or Mac, which becomes your Apple ID. Hence, if you are looking for a way to change your Apple ID, it is likely that you have switched to a new email address or want to use another email address as your Apple ID.
If this is not the case, you might be looking for a way to login to iPhone with another existing Apple ID or want to use a totally New Apple ID on iPhone.
Since, it is quite normal for users to change email addresses and email service providers, Apple provides the option to change the Email Address linked to Apple ID, without any loss of data and app store purchases.
However, when you Login to iPhone with another existing Apple ID or use a New Apple ID (without going through the linked email change process), you will be losing access to all the data & app store purchases linked to your previous Apple ID.
Change Apple ID on iPhone
If you are looking for a way to change the Email Address linked to your Apple ID, you need an Email Address which has not been associated with an Apple Account during the last 30 days.
If you are switching to a New Apple ID, you need a totally New Email Address, which has never been used to create an Apple ID or associated with any Apple product or service in the past.
Note: Previously it was not possible to change @icloud.com email address, but now you can do it by using a newer model of iPhone (iOS 18.1 or later).
1. Change Email Address Linked to Apple ID
Make sure that you have access to the Email Address that you want to use in this process and follow the steps below to change the Email Address linked to your Apple ID.
1. Open Settings > tap on your Apple ID Name.
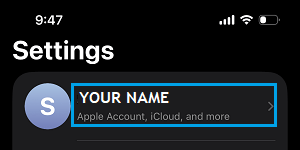
2. From Apple ID screen, go to Sign-In & Security > select your Primary Email Address.
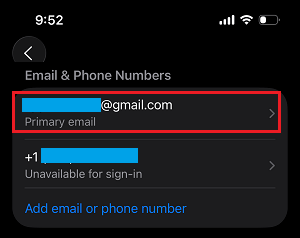
3. On the next screen, select Remove from Account option > On the confirmation pop-up, tap on Remove from Account to confirm.
4. On the next pop-up, select Add New Primary Email Address option.
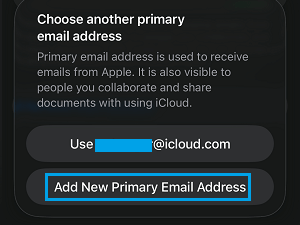
Note: You may be prompted to enter your current Apple ID and Password or verify your identity by answering two Security Questions.
5. On the next screen, enter your New Email Address and tap on Continue.
6. Apple will now send a verification code to your New Email Address. Get the verification code by logging in to your Email Account and enter the Verification Code on the next screen.
Once your Email Address is verified, you will be prompted to confirm that your New Email Address can be used for iMessage and other Apple services.
2. Use Another Apple ID on iPhone
All that is required to use another Apple ID on iPhone is to logout from its current Apple ID and login using the other Apple ID.
1. Go to Settings > Apple ID Name > Scroll down and tap on Sign Out.
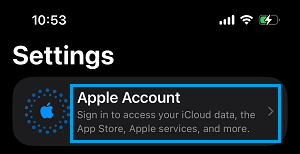
2. After you are completely signed-out, tap on Apple Account.
3. On the pop-up, select Sign-in Manually option > Enter the Other Apple ID Email Address and Password linked to the other Apple ID.
While this process is easy, you need to be aware that logging into iPhone using another Apple ID can lead to the following issues and is not recommended from privacy point of view.
iCloud Data Sync: Photos, Contacts, Notes, Calendar events and App data associated with the New Apple ID will begin syncing to your device.
Messages & FaceTime: You will lose access to messages linked to the previous Apple ID and all incoming messages and FaceTime requests will be tied to the New Apple ID.
Apps, Music, Books & Subscriptions: You will gain access to Apps, Music, Books and subscriptions linked to your New Apple ID.
Photos & Videos: You should have no problem accessing photos & videos located on the local or internal storage of your iPhone. However, you will be losing access to iCloud photos and videos linked to the previous Apple ID.
3. Use New Apple ID on iPhone
In this case, the intention is to replace the current Apple ID on iPhone with a totally New Apple ID, which has no links or relationship with the Apple ID that is currently being used on your iPhone.
Since, this results in loss of data, you may want to Download All Photos from iCloud to computer and also download a complete backup of your device to Mac or Windows computer.
1. Go to Settings > tap on your current Apple ID Name.
2. On Apple Account screen, scroll down to bottom of the screen and tap on Sign Out.
3. On the pop-up, select Sign Out But Don’t Erase option > Follow the prompts to Sign out from the current Apple ID.
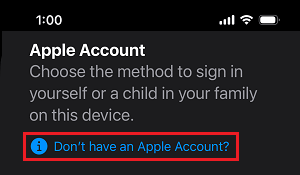
4. After you are signed-out, tap on Apple Account.
5. Tap on Don’t have an Apple Account Link.
6. Follow the prompts to select your Age Group > Enter First & Last Name > Enter Date of Birth.
7. On the next screen, enter the Email Address that you want to use as your Apple ID and tap on Continue.
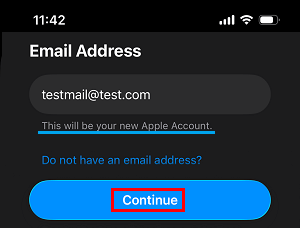
8. Follow the prompts to verify the Email Address and complete the process.
Now the New Email Address that you provided in the above steps will become your New Apple ID and it will have no connection or relationship with your previous Apple ID.