While the problem of a USB Flash Drive or any other USB Device not being accessible on the computer could be due to a glitch, outdated driver or other reasons, it could also be due to the use of USB ports on the computer being disabled.
This is likely to be the case, if the computer is located at place of work, you are using a computer provided by the employer to work from home or the computer was bought from an auction held by a company.
In such cases, you won’t be able to access USB devices on your computer, unless the disabled USB port is enabled in Device Manager or the use of USB ports is enabled by using Registry Editor.
Enable USB Ports in Windows 11/10
If you the Home Edition of Windows operating system is installed on your computer, you can enable USB Drives by using Device Manager and Registry Editor.
If the computer is running Windows Pro or Windows Enterprise, you can make use of Group Policy Editor to enable and disable USB Drives.
1. Enable USB Ports Using Device Manager
The easiest way to enable the use of USB Ports on a Windows computer is by using Device Manager.
1. Right-click on Start button and click on Device Manager.
2. On the “Device Manager” screen, expand Universal Serial BUS Controllers entry > right-click on the USB Drive Controller and click on Enable.
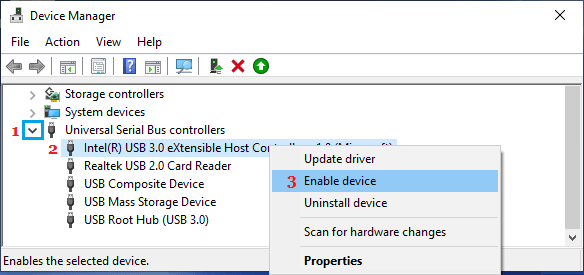
3. Repeat this step for other entries under “Universal Serial Bus Controllers” section.
2. Enable USB Ports Using Registry Editor
If the above method did not help, you may need to enable the use of USB ports on your computer by using Registry Editor.
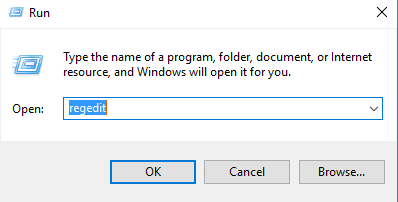
1. Press Windows + R keys to open Run Command.
2. In the Run Command window, type regedit and click on OK.
3. On the Registry Editor screen, navigate to HKEY_LOCAL_MACHINE\SYSTEM\CurrentControlSet\Services\USBSTOR
4. Next, click on USBSTOR in the left-pane. In the right-pane, double-click on the Start key.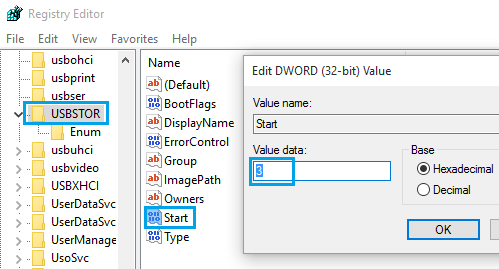
5. In the Edit DWORD pop-up, change the Value Data to 3 and click on OK.
After this, you should be able to access USB Devices attached to any of the USB Ports on your computer.
3. Use Local Group Policy Editor
If you are using the Professional edition of Windows, you can make use of Group Policy Editor to enable the use of USB ports on the computer.
1. Open Run Command > Type gpedit and press the enter key.
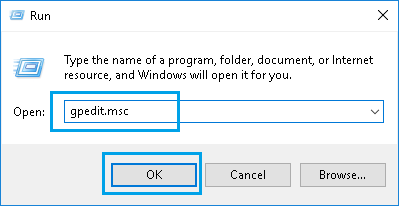
2. On Group Policy Editor screen, navigate to Computer Configuration > Administrative Templates > System > Removable Storage Access and double-click on Removable Disks: Deny read access entry.
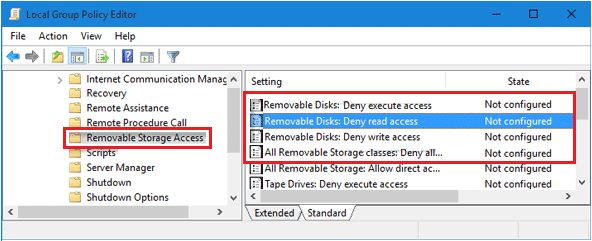
3. On the next screen, select the Enabled option.
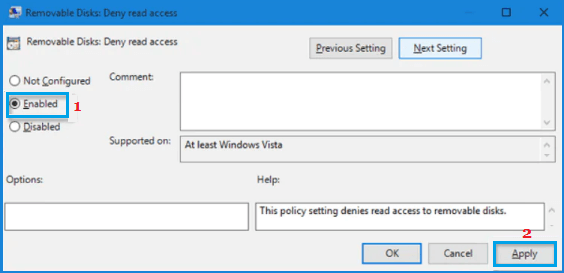
4. Click on Apply and OK to save this change on the computer.
4. Enable USB Ports In BIOS
The use USB ports can be enabled and disabled in BIOS/UEFI settings of the computer.
1. Restart the computer (or Switch ON; if is already powered off).
2. As the computer is starting up press F2 or the designated key to Enter BIOS.
3. On the BIOS screen, use the left-pane to navigate to Settings > System Configuration > USB Configuration.
4. Select Enable External USB Port option to enable the use of USB ports on the computer.