If your MacBook is not showing the correct data & time, the reason could be due to your device not being connected to internet for an extended period of time; which prevents the MacBook from obtaining time from Apple’s reliable time service (time.apple.com).
Others common reasons for a MacBook showing the wrong Time or Date are usually the following.
- Incorrect Time Zone: Incorrect manual selection of the Time Zone or a change in Time Zone while travelling.
- PRAM/NVRAM/SMC: Hardware level memory areas that store system settings; including Time can get corrupted.
- CMOS Battery: This hardware-level battery can get drained over a period of time; leading to the computer clock slowing down and displaying incorrect Time & Date.
Fix: Slow or Incorrect Time on Mac
If your MacBook, Mac Mini or iMac is showing incorrect Time and Date, you should be able to fix the problem using the following troubleshooting steps.
1. Allow Mac to Automatically Update Time
Make sure that your MacBook is set to obtain Time/Date automatically by connecting to Apple’s time service.
1. Click on Apple Logo in the top-menu bar and select System Settings in the drop-down menu.
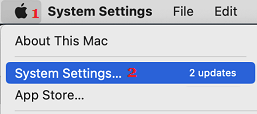
2. From the System Settings screen, go to Date & Time and make sure Set Date and Time Automatically option is selected.

If it is not, enable Set Date and Time Automatically option and make sure your Mac is showing the correct Time & Date.
Note: You need to be logged in to your Admin Account in order to make this change.
2. Allow Mac to Automatically Set Time Zone
If you are a frequent traveler, you can set MacBook to automatically set its Time Zone based on its current Location. This option is suitable in case you travel frequently across different Time Zones.
1. Click on Apple Logo in the top-menu bar and select System Settings in the drop-down menu.
2. From System Settings screen, go to Date & Time > switch to Time Zone tab and enable Set Time Zone Automatically using current location option.
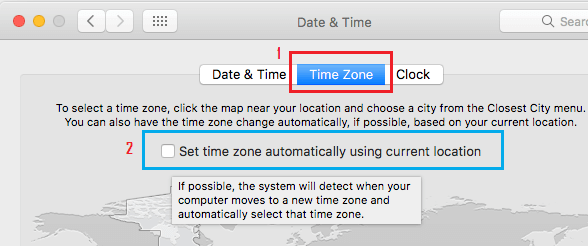
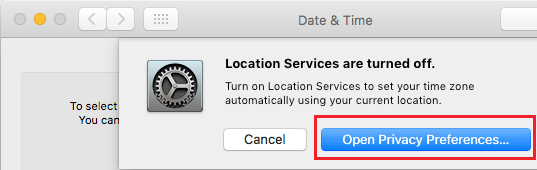
Note: If the “Location Services” is not enabled on Mac, you will see a popup, click on Open Privacy Preferences… button.
3. On the next screen, select Enable Location Services box and click on Details… button, located next to System Services entry.
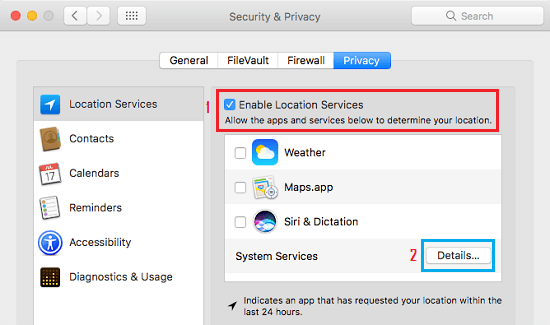
4. On the next screen, enable the option for Setting Time Zone and tap on Done.
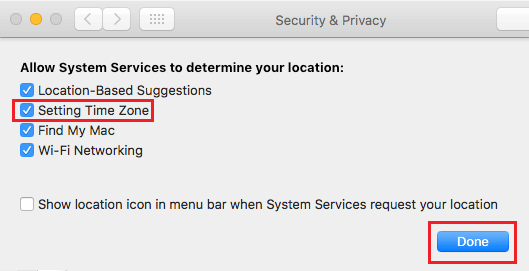
After this, your MacBook will be able to automatically update Date and Time based on its Location.
3. Manually Correct Date & Time On Mac
If required, you can manually correct the Date and Time on your MacBook.
1. Click on Apple Logo in the top-menu bar and select System Settings in the drop-down menu.
2. From System Settings screen, go to Date & Time and uncheck Set Date and Time Automatically option.
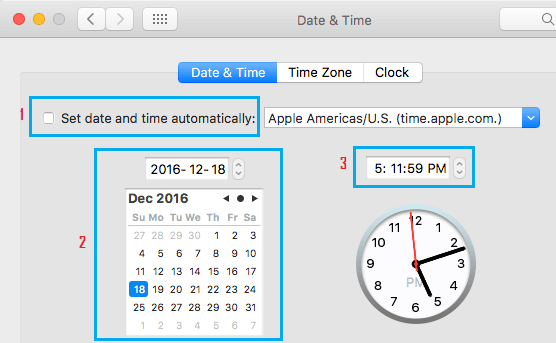
3. After unchecking “Set Date & Time Automatically” option, manually select your Time Zone and correct Date and Time as required.
4. Reset PRAM/NVRAM/SMC
As mentioned above, the incorrect Time & Data issue on a MacBook could also be due to essential memory areas on the MacBook becoming outdated or corrupted.
This can be fixed by resetting NVRAM/PRAM/SMC to factory default settings by using steps as provided in these guides:
5. Replace CMOS Battery
If the Time is slowing down on a older Mac (pre-2012), the problem could be due to the battery which powers the CMOS chip coming nearer to its EOL (End of life).
For the steps to replace the CMOS battery on a older MacBook, you can take a look at this Battery Replacement guide from IFIXIT.
In the case of Newer MacBooks (2013 and newer), System Time and PRAM settings are managed by a built-in supercapacitor; which is powered by the main battery.