Users have reported the strange problem of iPhone being connected to Wi-Fi network, but there is actually no internet connectivity and iPhone is unable to access any website on the internet.
In a typical case of this nature, you can clearly see iPhone being connected to a Wi-Fi network, but it fails to connect to the internet and is unable to open any website or webpage on the internet.
There could be various reasons for this problem, ranging from minor software glitches and incorrect or corrupted network settings to other reasons.
iPhone Connected to Wi-Fi but No Internet Connection
You can find below the troubleshooting steps requited to fix this annyoing problem of iPhone appearing to be connected to Wi-Fi network but actually there is no internet connectivity.
1. Restart iPhone
Before going ahead with other steps, restart your device to rule out the possibility of the problem being caused due to a stuck app or process, which might be preventing iPhone from connecting to Internet.
1. Go to Settings > General > tap on Shut Down.
2. Allow iPhone to completely Shut Down > Wait for 30 seconds > Restart iPhone and try to connect to internet.
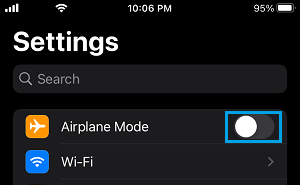
2. Enable and Disable Airplane Mode
The quickest way to refresh both Wi-Fi and Cellular connections on iPhone is to Enable/Disable Airplane mode.
1. Go to Settings > enable Airplane Mode by moving the slider to ON position.
2. After 30 seconds, disable Airplane Mode by moving the slider to OFF position.
3. Power Flush Modem/Router
1. Switch OFF the Power Supply to your Modem/Router – Use the switch (if available) or Unplug the power cable from the wall socket.
2. Make sure you wait for at-least 60 seconds and restore back the power supply to Modem.
The above step resets Wi-Fi Network, assigns a New IP Address to your iPhone (if required) and fixes most WiFi connectivity problems.
4. Install Updates
Sometimes, the problem is due to an update waiting to be installed on your device.
1. Go to Settings > General > Software Update.
2. On the next screen, allow iPhone to check for updates and Install Updates (if available).
5. Forget Wi-Fi Network and Rejoin
Note down the password for your Wi-Fi Network and follow the steps below to forget Wi-Fi Network and rejoin the Network.
1. Go to Settings > Wi-Fi > select your Wi-Fi network.

2. On the next screen, select Forget This Network option.

3. On the confirmation pop-up, tap on Forget to confirm.
After this, select your Wi-Fi Network > enter Wi-Fi Network Password to join the Network.
6. Turn OFF Wi-Fi Assist
The problem could be due to the Wi-Fi Assist feature trying to automatically switch your iPhone from Wi-Fi to Cellular Network.
1. Open Settings > tap on Cellular.
2. On the next screen, disable Wi-Fi Assist.

7. Disable VPN
If you are using VPN, disable the VPN service on your iPhone and see if you can connect to the internet.
1. Go to Settings > General > VPN & Device Management.
2. On the next screen, disable VPN by movind the slider to OFF position.
8. Reset Network Settings
Resetting the Network Settings on your iPhone to its orginal Factory default settings can help, if the problem on your iPhone is being caused due to damaged or corrupted settings.
1. Go to Settings > General > Transfer or Reset iPhone > select the Reset option.

2. On the pop-up, select Reset Network Settings option.

3. You will be required to enter your Lock Screen Password to authorize this process.
After the Reset Process is completed, rejoin Wi-Fi Network and you should now be able to access the internet on your iPhone.