If your Android phone is coming up with “No SIM available” or “No SIM Card Installed” error message, you won’t be able to make calls or send text messages using your Carriers mobile network.
While this error message is usually caused due to a displaced, improperly inserted or loose SIM Card, it can also be caused due to software glitches or a bug that is preventing the SIM Card being read.
Other reasons for “No SIM” error message could be due to Incorrect Network Mode/Network Operator being selected, SIM Card being blocked, deactivated, damaged or due to carrier updates not being installed.
Fix No SIM Card Installed Error on Android Phone
If your Samsung Galaxy phone or any other Android Phone is coming up with “No SIM”, “no SIM available” or “No SIM Card Installed” error message, you should be able to fix the problems using the following steps.
1. Restart Your Device
As mentioned above, the problem could simply be due to a stuck program or process preventing the SIM Card from being read or recognized by your device.
In most cases, this can be fixed by switching OFF the device and restarting it back again after waiting for 30 seconds.
2. Set Network Mode to Auto
This is usually the problem with many users, where the “Network Mode” setting gets switched to an incorrect type leading to “No SIM Card” error message.
1. Go to Settings > Mobile Networks > Network Mode.
2. On the pop-up, select LTE/WCDMA/GSM Mode.
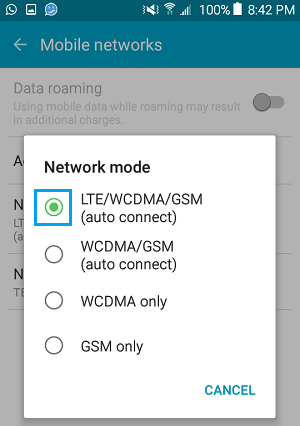
Setting the Network Mode to Auto Connect for any of the 3 major Networks should fix the problem on your Android Phone.
3. Select the Right Network Operator
As mentioned above, the problem could be due to the “Network Operator” setting on your Android Phone not matching with the Carrier that you are currently with.
1. Go to Settings > Mobile Networks > Network Operators.
2. On the next screen, tap on Search networks and wait for your Android Phone to search networks.
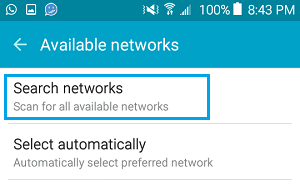
3. Once the search is complete, select the Name of the Carrier that you are currently with.
4. Enable/Disable Flight Mode
Switching ON Airplane Mode and switching it OFF resets Mobile Networks and is known to fix Network connectivity issues.
1. Go to Settings > Flight Mode > Enable Flight Mode by moving the slider to ON position (Green).
2. Wait for 30 seconds > Disable Flight Mode by moving the slider to OFF position (White).
5. Remove & Reinsert SIM Card
Remove the SIM Card from your Android phone and make sure it is not bent, broken or damaged in any way. Also inspect the SIM Slot and the SIM Tray to make sure they are clean and free from obstructions.
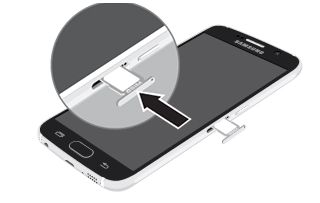
You can make use of a flashlight to take a good look inside the SIM tray opening and blow out the dust (if any). After the inspection is completed, make sure that you properly Reinsert the SIM Card and close the SIM tray.
If you have an Unlocked phone, try replacing the SIM Card with a SIM Card from another phone and see if it works. Alternatively, you can try using your SIM Card on another phone and see if it works.
5. Reboot Android Phone
A reboot or a Hard Reset can terminate software conflicts, which might be responsible for the SIM Card not working properly or not being recognized by your Android device.
1. Make sure the battery on your Android Phone is charged to at-least 50%.
2. Press and hold Volume Down and Power button at the same time, until you see the screen of your Android Phone going black.
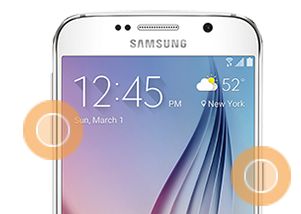
3. Release both buttons, when you see the screen going black.
4. You will find your Android phone performing a simulated battery disconnect, after which you should find your device restarting with the manufacturers Logo.
Note: The information on a SIM card can be easily damaged by scratching or bending. Hence, you need to be careful while handling, inserting, or removing the SIM card.