You won’t be able to access the internet, if the Google Chrome browser installed on your computer is coming up with “Server DNS address could not be found” error message.
The reason for this problem on a Windows computer could be due to the DNS servers of your Internet service provider being busy, the Host cache being corrupted and other reasons.
Server DNS Address Could Not Be Found Error
If your computer is coming up with “DNS Address Could Not Be Found” error, even after clearing the browser cache, the problem could be due to the website name not resolving to its DNS address on the internet.
For example, when you type “google.com”, the DNS server translates it to 216.58.218.196, which allows the web browser to connect to the IP address at which Google’s website is located.
In most cases, the problem of Google Chrome browser coming up with “DNS Address could not be found” error message can be fixed using the following steps.
1. Clear Host Cache
If you are using browser extensions or plugins, follow the steps below to clear the Host Cache on your computer.
1. Open Chrome browser > click on 3-dots menu icon > New Incognito Window.
2. Type chrome://net-internals/#dns in the address bar and press the Enter Key.
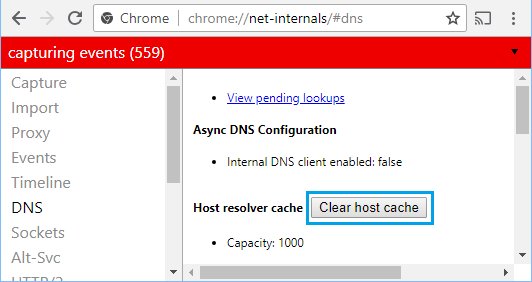
3. Click on Clear host cache button, located next to ‘Host Resolver Cache’ field.
2. Restart DNS Client Service
Follow the steps below to Restart the DNS Client service on your computer.
1. Right-click on the Start button and click on Run.
2. In Run Command window, type services.msc and click on OK.

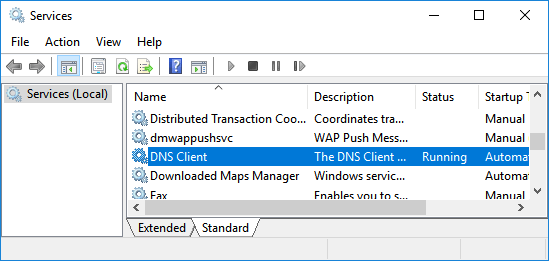
3. On the Services screen, scroll down till you reach DNS Client. Right-click on DNS Client and click on Restart.
After Restarting DNS Client, open the web browser on your computer and see if you are able to access the internet on your computer.
3. Flush DNS Cache
The next step would be to flush the DNS Cache and register DNS address.
1. Type Command Prompt in the search bar > right-click on Command Prompt App and select Run as Admin option.

2. On Command Prompt screen, type ipconfig /flushdns and hit the Enter key.
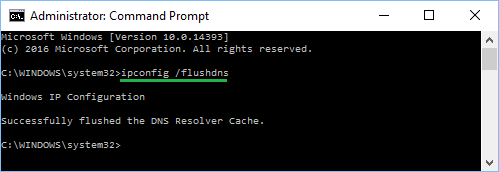
3. After this type ipconfig /registerdns and press the Enter key.
4. Power Flush Modem/Router
Power Flushing the Modem/Router can help in fixing network connectivity issues.
1. Switch OFF the Modem/Router.
2. After 60 seconds > Switch ON the Modem/Router.
After all the lights on the Router/Modem unit are switched ON, try to connect your computer to the internet.
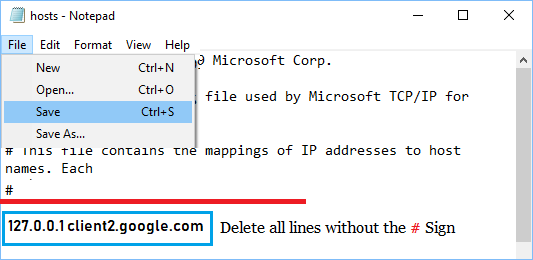
5. Edit Hosts File
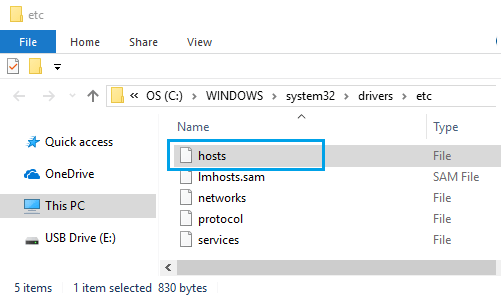
In rare cases, Windows Hosts File located at “C:\windows\system32\drivers\etc” can get modified, preventing access to certain websites.
1. Right-click on the Start button and click on Run.
2. In the Run Command windows, type C:\windows\system32\drivers\etc and click on OK.

3. On the next screen, double click on the Hosts File and select Notepad option in the contextual menu to open this file.
4. In Hosts File, scroll down and delete all lines containing 127.0.0.1 clients2.google.com and Save the file.
If you cannot find any additional entries in the Hosts File, simply close the editing window without saving the file.
If the Hosts File has been changed, you need to scan your computer for malware using Windows Defender Offline Scan or by using the Antivirus software installed on your computer in Safe Mode.
6. Switch DNS Servers
If your computer is frequently coming up with Server DNS could not be found error, the problem is most likely due to the DNS Servers of your service provider becoming congested in your area.
In such cases, it can be benificial to Switch the DNS Servers on your computer to other free public DNS Service Providers like Google, OpenDNS and Amazon.