If your computer has become painfully slow and taking up a long time to open apps, files and web browser, it is likely to be suffering from high disk usage, which is popularly known as “100% Disk Usage” problem in Windows.
The clearest indication of high disk usage (over 80%) is provided by aggressive fan noise produced by the cooling fans of the computer; as they keep constantly kicking into high gear to expel the heat produced by hard drive and the processor.
This issue on a Windows computer can be easily confirmed by opening Task Manager and taking a look at the Disk column under Processes tab.
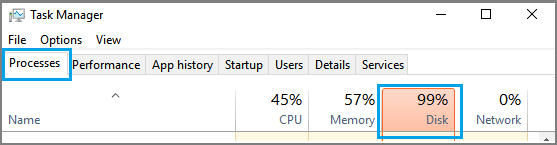
As you can see in image above, the Disk column is marked red with High Disk Usage (99%), which means the resource usage on the computer has maxed out.
Fix High Disk Usage in Windows 11/10
While the issue of high disk usage on a Windows computer is usually caused due to background running apps, antivirus scans and Windows updates, it can also be caused by outdated drivers and failing hardware (HDDs).
Based on the most common reasons, the issue of sustained high disk usage on a Windows computer can be fixed by using the following steps.
1. Force-Stop SysMain and Windows Search Indexer
You should be able to achieve an immediate reduction in the high disk usage on your computer by force-stopping SysMain (Superfetch) and Windows Search Indexer.
1. Right-click on Start button and click on Command Prompt (Admin).
2. On the Command prompt screen, type net.exe stop sysmain and press the enter key.
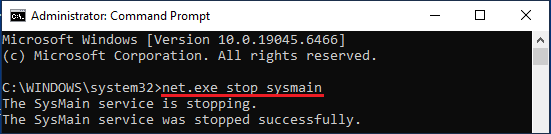
3. Next, type net.exe stop “windows search” and press the enter key to stop the background running Windows Search service.
After this, press Ctrl + Shift + Esc keys to open Task Manager and see if the Disk Usage has reduced.
2. Disable Windows Search indexing
Preventing the background running “Windows Search Indexing” service from automatically starting up with the computer can prevent the High Disk Usage problem from returning back on computers with HDD drives.
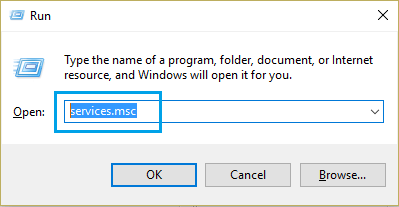
1. Press Windows + R keys to open Run Command.
2. Type services.msc and click on OK.
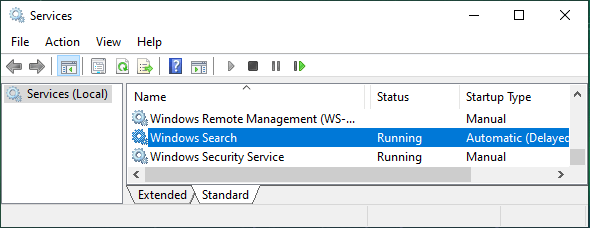
3. On the Services screen, open Windows Search properties by double-clicking on it.
4. On “Windows Search Properties” screen, change the Startup type to Disabled and click on the Stop button.
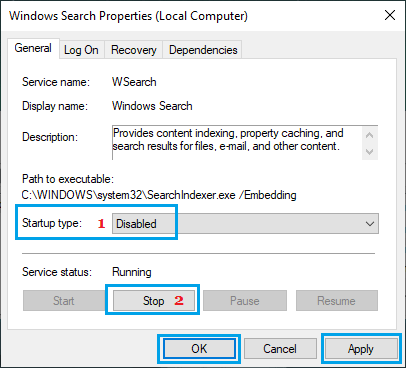
The downside of disabling Windows Search Indexer comes in the form of delay in File Explorer Search results and a slight delay in launching of the start menu.
3. Disable SysMain (SuperFetch)
Although, you have stopped the SysMain service using Command prompt, it needs to be disabled; in order to prevent the high disk usage problem from returning back on your computer.
While the SysMain service (previously know as SuperFetch) can improve system responsiveness by preloading frequently used applications into RAM, it has been associated with High Disk Usage.
For more information and the actual steps to disable SysMain (SuperFetch), you can refer to this guide: How to Enable or Disable SuperFetch in Windows 11/10.
4. Reset Virtual Memory
Resetting Virtual memory can help in resolving 100% disk usage problem on a Windows computer by clearing out corrupted paging files and preventing the hard drive from being overworked.
1. Type Advanced System Settings in Windows Search Bar and click on View Advanced System Settings option in the Search results.

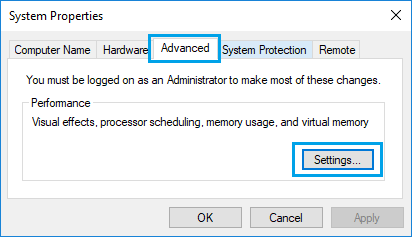
2. On “System Properties” screen, make sure you are on Advanced tab and click on the Settings button located under “Performance” section.
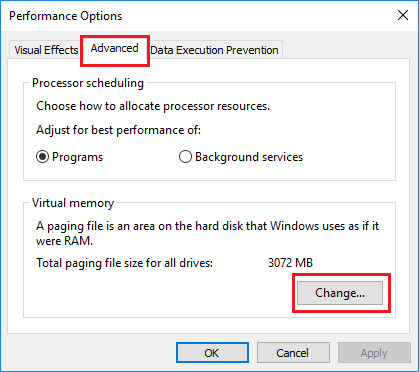
3. On the next screen, go to Advanced tab and click on the Change button located under “Virtual Memory” section.
4. On the Virtual Memory screen, uncheck “Automatically manage paging size” option, make sure your Drive is selected, select the Custom Size option, Set an Initial & Maximum size for virtual memory and click on the Set button.
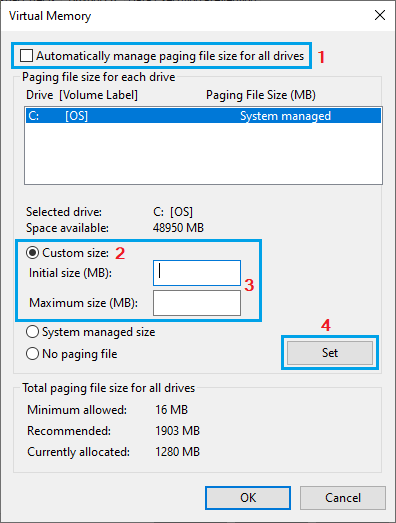
The recommended Initial & Maximum size is 1.5 times and 3 times the amount of RAM available on the computer.
For example, for a computer with 8 GB RAM, you can set the Initial size to 12,288 MB and Maximum size to 24,576 MB.
5. Disable MSI Mode in StorAHCI.sys Driver
If you are facing High Disk usage on a computer with SSD drive, the problem could be due to a firmware bug that prevents SSD drives from completing input/output requests.
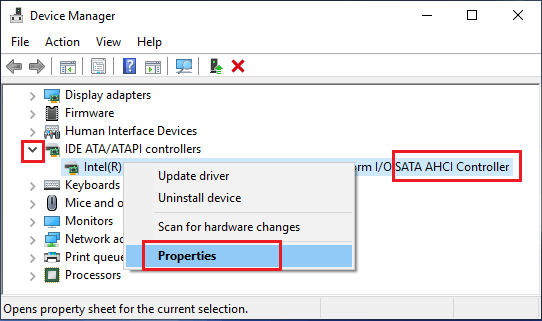
1. Right-click on Start button and click on Device Manager.
2. On Device Manager screen, expand IDE ATA/ATAPI controllers > right-click on Standard SATA AHCI Controller and click on Properties.
3. On the next screen, switch to the Driver tab and click on Driver Details.
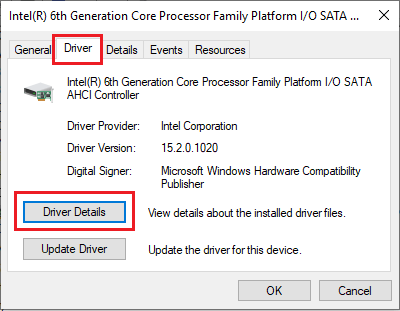
If you see storachi.sys entry on the Driver Details screen, you need to disable MS Mode for the Driver by using Registry Editor as provided on Microsoft’s support page.
6. Check/Repair System Files
The next step would be to rule out the possibility of the High Disk Usage problem on your computer being caused due to corrupted system files.
This can be done by checking the System Files for damage and repairing them (if required) by using steps as provided in this guide: How to Repair Corrupted System Files In Windows 11/10.
7. Check Hard Drive for Errors
Presence of bad and damaged sectors on the Hard Drive can lead to High Disk Usage problem.
1. Type PowerShell in the Search bar > right-click on Windows PowerShell and click on Run as administrator option.

2. On the PowerShell screen, type chkdsk.exe /f /r and press the Enter key.
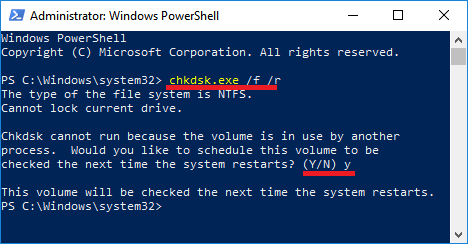
If you are prompted to schedule volume to be checked on next restart, type Y
3. Close the PowerShell Window > Restart the computer and patiently wait for Windows to scan the Hard drive for errors and repair bad sectors (if any).
Note: This process can take a very long time (5 to 12 hours or more).
8. Upgrade Hardware
The problem of high or 100% Disk usage is more commonly noticed on Windows computers using older mechanical Hard Disk Drives (HDD); which can handle very low Input/Output operations per second, compared to SSD Drives.
You can consider the option of replacing the older and slower mechanical Hard Disk Drive on your computer with a faster SSD Drive.