If “This PC” Icon is missing from the Desktop on your computer, it is likely that it is not appearing due to a temporary glitch or missing after installation of an app or update on the computer.
In addition this, it is not uncommon to find cases of “This PC” Icon being accidentally deleted, while trying to clear up the clutter of Files/Folders on the Desktop.
Luckily, “This PC” is only a Desktop Shortcut and deletion or removal of this Shortcut has practically no impact on files/folders that it points to.
Add “This PC” to Desktop in Windows 11/10
At any time, you can add ‘This PC’ Icon back to the Desktop on your computer and it will once again start providing you with quick access to important locations of files and folders on the computer.
Once “This PC” Icon is added back to Desktop, you will be able to gain quick access to Hard Disk, Storage Drives, Network Locations and major folders like Documents, Downloads, Music, Pictures and Videos on your computer by clicking on it.
You can find below three different methods to Add “This PC” Icon to the Desktop of a Windows computer.
1. Add “This PC” to Desktop Using Desktop Context Menu
You can follow the steps below to Add “This PC” Shortcut to Desktop using the right-click contextual menu.
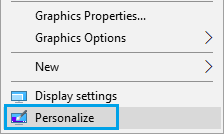
1. Right-click in any Empty space on the Desktop and click on Personalize.
2. On the Personalization screen, scroll down in the right-pane and click on Themes.
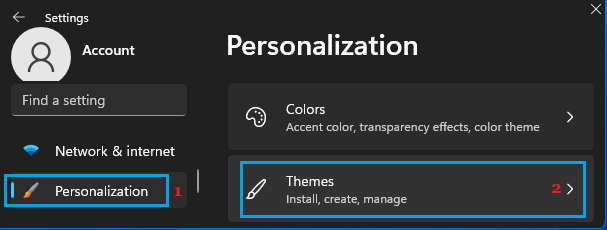
3. On the Themes screen, scroll down to “Related Settings” section and click on Desktop Icon Settings.
![]()
4. On Desktop Icon Settings screen, select the little box next to Computer and this will Add “This PC” Shortcut to the desktop of your computer.
![]()
5. Make sure you click on Apply and OK to save this setting on your computer.
2. Add “This PC” to Desktop Using Run Command
Another way to Add “This PC” Icon to Desktop is by using Run Command.
1. Press Win + R keys to open Run Command on your computer.
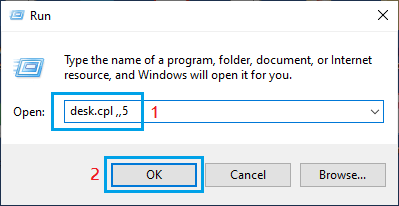
2. In the Run Command window, type desk.cpl ,,5 and click on OK.
3. On Desktop Icon Settings screen, check the Computer box and this will add “This PC” Icon to the Desktop of your computer.
![]()
4. Click on Apply and OK to save this change on your computer.
3. Add “This PC” to Desktop Using File Explorer
Perhaps the easiest way to Add “This PC” icon to the Desktop of a Windows computer is by using File Explorer.
1. Click on File Icon located on the Taskbar or press Win + E keys to open File Explorer on your computer.
2. On the File Explorer screen, you will find This PC in the left sidebar menu.
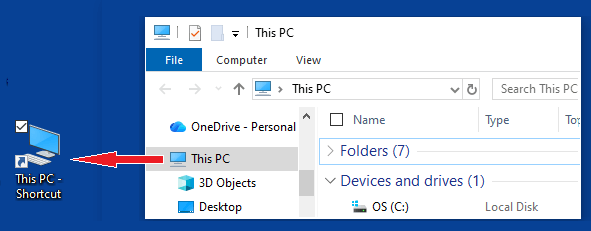
3. Simply Drag and Drop This PC to the Desktop of your computer.
As you can see in above image, the Desktop Icon appears as “This PC – Shortcut”. However, you can easily correct this issue by renaming the Shortcut as “This PC” or even “My Computer.
4. Rename “This PC” as “My Computer”
If you have been a long user of Windows, you might be able to recall that “This PC” Icon was popularly known as “My Computer” in the older versions of Windows.
If you are feeling nostalgic, you can Rename This PC as My Computer by right-clicking on This PC Icon and selecting the Rename option in the menu that appears.

Similarly, you can Rename other Desktop icons and provide your own unique names to most used Desktop Icons on your computer.