• Skip to main content
  • Skip to primary sidebar

Techbout

Technology Simplified.

  • Windows
  • Mac
  • iOS
  • Android
  • Office

How to Remove Location Data From Photos On iPhone

By: Waseem Patwegar

When you shoot Photos with iPhone and share them online, you also end up sharing your location data with others. You will find below the steps to Remove Location Data from Photos on iPhone.
Remove Location Data From Photos On iPhone

Remove Location Data From Photos On iPhone

The Camera app on your iPhone adds EXIF data to every photo that you take using the Camera on your iPhone.

Along with technical information, EXIF data also contains information bout the date, time and the location at which a particular photo was taken.

While the technical information included in EXIF Data can be useful for learning and improving Photography skills, the location information can be misused.

Luckily, you can deal with this issue by preventing your iPhone from adding Location Data to Photos.

In case you already have Photos with Location Data, you can Remove Location Data from Photos using Apps designed for this purpose.

1. Remove Location Data From Existing Photos on iPhone

There are many Apps in the App Store that can help you view and remove EXIF Data from Photos on your iPhone. In this case, we are making use of a paid App known as ViewExif ($0.99).

This App allows you to remove Location Data from Photos before sharing them with others, while still preserving the original Photo along with its Exif data.

1. Open the App Store on your iPhone and search for ViewExif App.

2. Download & Install the ViewExif App on your iPhone.

3. Next, open the Photos app on your iPhone and select the Photo that you want to share with others.

4. On the next screen, tap on the Share icon located at the lower left corner of your screen.

Share Icon on iPhone Photos App

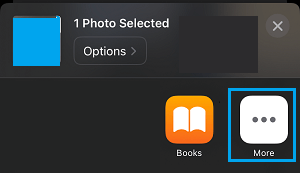
5. On the Share menu that appears, swipe left on the lower menu and tap on the More option.

More Option in Sharing Menu on iPhone

6. On the next screen, toggle ON the option for ViewExif and tap on Done.

Enable ViewExif Option on iPhone

7. Once ViewExif option is enabled on iPhone, you will see the ViewExif option in the share menu.

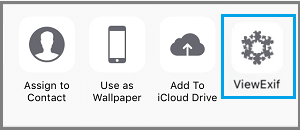
8. Back on the Share Menu, tap on ViewExif option (See image below).

ViewExif Option in iPhone Share Menu

9. You will be prompted to allow “ViewExif” to access your photos. Click on OK.

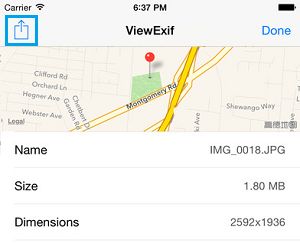
10. On the ViewExif screen, tap on the Share icon in the upper left corner of your screen.

Share Option in ViewExif App On iPhone

11. On the popup that appears, tap on Share without Metadata option.

Share Photo Without Metadata Pop-up on iPhone

Once you tap on Share Without Metadata option, ViewExif App will make a copy of the photo without its EXIF Data and make it available for sharing.

Next, you will be prompted to select how you want to share the Photo. You will be able to select from AirDrop, Messages, Mail, Facebook, WhatsApp and various other sharing options as available on your iPhone.

Anyone viewing the Photo that you just sent will not be able to see your Location Data.

As mentioned above, the original Photo will still remain on your iPhone along with all its EXIF Data.

2. Prevent Location Data From Being Attached to Photos On iPhone

Follow the steps below to prevent location data from being attached to Photos on iPhone.

1. Open Settings on your iPhone > scroll down and tap on Privacy.

Privacy Option on iPhone Settings Screen

2. On the Privacy screen, tap on Location Services.

Location Services Option on iPhone Privacy Screen

3. On the Location Services screen, tap on Camera.

Camera option on Location Services Screen on iPhone

4. On the next screen, tap on Never.

Disable Location Services For Camera On iPhone

This setting will prevent your location information from being recorded on any photos or videos that you shoot using the Camera of your iPhone.

Related
  • How to Prevent Apps from Tracking Your Location On iPhone
  • Can’t Change Location Services On iPhone

Primary Sidebar

Twitter
Facebook

Popular Now

  • How to Boot Windows 10 From USB Drive
  • How to Backup iPhone to iCloud
  • How to Check Computer Specs in Windows 10
  • How to Remove Bloatware From Windows 10 PC
  • How to Setup Chromecast on Android and iPhone

Gadget Guide

  • Mac vs PC Comparison: Should You Buy Mac or PC
  • Chromebook vs Windows Laptop
  • Kindle E-Reader Comparison | Which Kindle to Buy
  • iPad vs iPad Pro Comparison
  • Advantages of Chromebooks


About | Privacy Policy | Disclosure | Terms | Contact
© Copyright 2021 @Techbout.com · All Rights Reserved