The default setting in Windows is to automatically disable Wi-Fi; whenever an Ethernet cable is plugged-in to the computer. If this is not happening, the computer remains available for connection from both Ethernet and Wi-Fi network, which can lead to network connectivity and security issues.
Connectivity issues can arise due to possibility of network conflicts between Wi-Fi & Ethernet and security issues due to the computer being accessible from two different points, one of which (Wi-Fi) may not be secure.
Turn OFF Wi-Fi When Ethernet is Connected
If your computer is not getting disconnected from Wi-Fi network when an Ethernet cable is plugged-in, the reason is most likely is due to the default network priority setting being disabled.
Hence, all that is required to make the computer turn-off Wi-Fi when an Ethernet cable is plugged-in is to revert back the computer to its default or original network priority settings.
Note: The steps provided below work only if the Network Adapter Installed on the computer supports this feature.
Switch OFF Wi-Fi When Ethernet is Connected
Make sure that your computer is connected to Wi-Fi and follow the steps below to make the computer automatically switch-off Wi-Fi, as soon as it is connected to a wired Ethernet connection.
1. Right-click on the Wireless icon located in the taskbar and click on Open Network and Sharing Center option in the menu that appears.
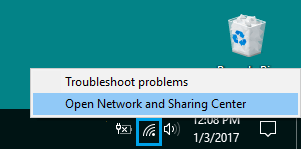
Note: If you do not find the Wireless Icon in the Taskbar, it should be available in the System Tray.
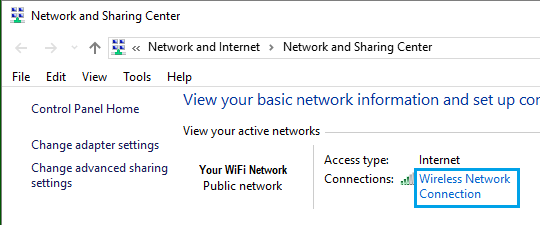
2. On “Network and Sharing Center” screen, double-click on the active Wireless Network Connection on your computer.
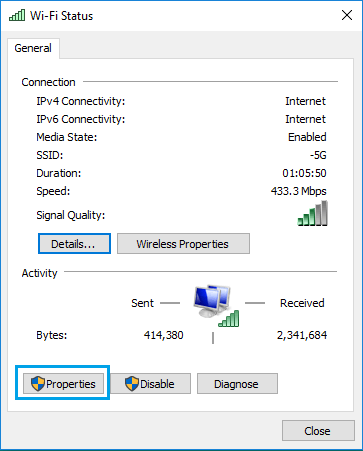
3. On the next screen, click on Wireless Properties button to open Wi-Fi Properties screen.
4. On “Wi-Fi Properties” screen, click on the Configure button; located below the listed Wireless Adapter.
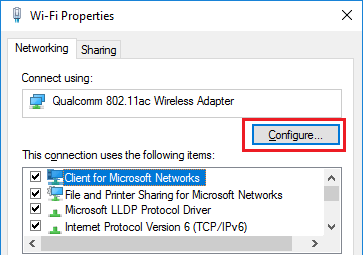
5. On the next screen, go to Advanced tab, select Disable Upon Wired Connect option in the property box and set its value to Enable in the Value Field and click on OK.
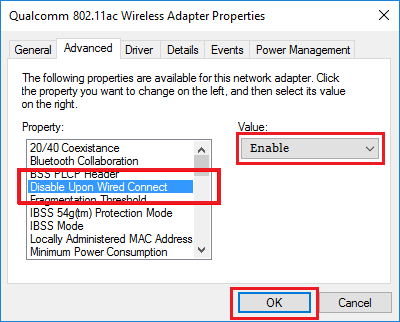
From now on, whenever you connect an Ethernet cable to the computer, you should find it automatically turning off the Wi-Fi network.
Note: If “Disable Upon Wired Connect” option is not available, it is likely that the Network Adapter on your computer does not support this feature.